本例利用jQuery實現一個鼠標托動圖片的功能。
首先設一個wrapper,wrapper內的坐標即圖片移動的坐標
|
1
2
3
4
5
|
#wrapper{ width: 1000px; height:1000px; position:relative; } |
設置圖片div,這個div即要拖動的div
|
1
2
3
4
5
6
7
8
9
|
#div1{ position: absolute; left:0px; top:0px; width: 300px; height: 200px; background: url("d:/Pictures/Earth.jpg"); background-size:contain; } |
上面設置了wrapper的定位為relative,div1的定位為absolute。
接下來設計拖動的算法:
思路如下:
1.鼠標點下時讓div跟隨鼠標移動
2.鼠標松開時停止跟隨
首先需要一個函數,他會將該div的坐標改變為當前鼠標的位置:
首先需要定義幾個變量,保存當前鼠標的坐標以及圖片的坐標
|
1
2
3
4
5
|
var timer; var mouseX=0; var mouseY=0; var pic_width = parseInt($("#div1").css("width")); var pic_height = parseInt($("#div1").css("height")); |
那么現在就需要為wrapper添加一個事件監聽器,鼠標在wrapper中移動時,修改變量mousex,mousey的值
|
1
2
3
4
|
$("#wrapper").mousemove(function(e){ mouseX = e.clientX; mouseY = e.clientY; }); |
編寫follow函數,并用計時器調用它
|
1
2
3
4
5
6
7
8
9
10
11
|
$("#div1").mousedown(function(){ timer=setInterval(follow,10); }); $("#div1").mouseup(function(){ clearInterval(timer); }); var follow = function(){ $("#div1").css("left",mouseX-pic_width/2); $("#div1").css("top",mouseY-pic_height/2); }; |
完整代碼如下所示:
|
1
2
3
4
5
6
7
8
9
10
11
12
13
14
15
16
17
18
19
20
21
22
23
24
25
26
27
28
29
30
31
32
33
34
35
36
37
38
39
40
41
42
43
44
45
46
47
48
49
50
51
52
53
54
55
56
57
58
59
60
|
<!doctype html><html> <head> <script type = "text/javascript" src = "jquery.js"></script> <style type = "text/css"> #wrapper{ width: 1000px; height:1000px; position: relative; background: linear-gradient(lightblue,white); font-size: 40px; } #div1{ position: absolute; left:0px; top:0px; width: 300px; height: 200px; background: url("d:/Pictures/Earth.jpg"); background-size:contain; } </style> </head> <body> <div id = "wrapper"> Lorem, ipsum dolor sit amet consectetur adipisicing elit. Impedit numquam accusamus explicabo praesentium laudantium et accusantium, ab ipsum, excepturi necessitatibus quos iste ad qui deleniti sed debitis reiciendis quam nisi. <div id = "div1"> </div> </div> <script> var timer; var mouseX=0; var mouseY=0; var pic_width = parseInt($("#div1").css("width")); var pic_height = parseInt($("#div1").css("height")); $("#wrapper").mousemove(function(e){ mouseX = e.clientX; mouseY = e.clientY; }); $("#div1").mousedown(function(){ timer=setInterval(follow,10); }); $("#div1").mouseup(function(){ clearInterval(timer); }); var follow = function(){ $("#div1").css("left",mouseX-pic_width/2); $("#div1").css("top",mouseY-pic_height/2); }; </script> </body></html> |
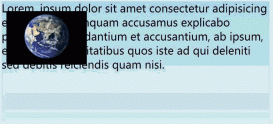
最終效果:

到此這篇關于jQuery實現鼠標拖動圖片功能的文章就介紹到這了,更多相關jQuery鼠標拖動圖片內容請搜索服務器之家以前的文章或繼續瀏覽下面的相關文章希望大家以后多多支持服務器之家!
原文鏈接:https://www.cnblogs.com/lucascube/p/14478329.html


