簡要說明
最近寫了一下vue控制權限(菜單、路由)的項目,用了vuex、addRoutes動態添加路由方法等,總共100多行代碼,跟大家分享一下~
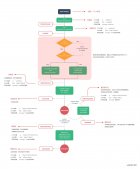
邏輯梳理
- 除登錄接口、退出接口外,其余接口增加token驗證。
- 打開頁面時請求獲取菜單接口,請求不成功說明未登錄,給route默認添加login頁面以及 * 重定向。
- 登錄成功后獲取到token,把token存入session以及請求頭。
- 登錄成功后獲取菜單接口,請求回來的路由和vuex里面全部的路由進行匹配,獲取component。
- 把獲取完component的路由格式化,找自己的parentId,如果找到的話插入到該元素的child里面。
思路大致就是這樣,有聽得模糊的也不要緊,跟隨我的步伐看看代碼是怎樣寫的你就明白了~
實現
1.初始化
route.js
|
1
2
3
4
5
6
7
8
9
10
11
12
13
14
15
16
|
import Vue from 'vue'import Router from 'vue-router'import store from '@/store'Vue.use(Router)const router = new Router()// 全局前置守衛router.beforeEach( async (to, from, next) => { let userRoutes = store.state.global.userRoutes //userRoutes 當前用戶擁有的權限 if (userRoutes.length && !userRoutes.filter(item => item.path == to.path).length) { next(from.path) return } next()})export default router |
大家可以看到route.js里沒有路由,因為路由都是動態添加進去的,只有一個全局守衛,作用是當登陸成功后,用戶地址欄手動輸入地址,判斷路由是否正確,如果正確就讓他跳轉。
vuex
|
1
2
3
4
5
6
7
8
9
10
11
12
13
14
15
16
17
18
19
20
21
22
23
24
25
26
27
28
29
30
|
//state.jsexport default { // 全部路由 allRoutes: [ //登錄頁面 { path: '/demo', name: 'demo', component: () => import('@/views/demo') }, { path: '*', redirect: '/demo' }, //主頁面 { path: '/', component: () => import('@/views'), }, { path: '/home', name: 'home', component: () => import('@/views/home') } ], // 用戶匹配的路由,要用addRoutes添加到route userRoutes: [], // 渲染用戶菜單 userMenus: []} |
state中需要定義全部的路由,這個用來跟后臺請求到的權限進行匹配,并且獲取component組件。
actions.js里面是主要的邏輯,其中getMenu方法是本文的核心
|
1
2
3
4
5
6
7
8
9
10
11
12
13
14
15
16
17
|
數據返回時格式menu = [ {id: 1, name: '首頁', path: '/home', parentId: 0}, {id: 2, name: '系統設置', path: '', parentId: 0}, {id: 3, name: '角色配置', path: '/roles', parentId: 2}, {id: 4, name: '用戶配置', path: '/users', parentId: 2}]需要處理成menu = [ {id: 1, name: '首頁', path: '/home', parentId: 0}, {id: 2, name: '系統設置', path: '', parentId: 0, child: [ {id: 3, name: '角色配置', path: '/roles', parentId: 2}, {id: 4, name: '用戶配置', path: '/users', parentId: 2} ] },] |
所以在下方需要用到遞歸來處理↓
|
1
2
3
4
5
6
7
8
9
10
11
12
13
14
15
16
17
18
19
20
21
22
23
24
25
26
27
28
29
30
31
32
33
34
35
36
37
38
39
40
41
42
43
44
45
46
47
48
49
50
51
52
53
54
|
//actions.js// 獲取當前用戶權限 getMenu: async ({ state, commit, dispatch }) => { //請求當前用戶所擁有的權限 let result = await axios('/api/menu/find') if (result.data.code > 0) { let userRoutes = result.data.result userRoutes.forEach(item => { item.child = [] state.allRoutes.forEach(res => { if (item.path == res.path) { item.component = res.component } }) }) let oneArr = [], anotherArr = [] //oneArr 一級路由 anotherArr 其他級別路由 oneArr = userRoutes.filter(item => !item.parentId) anotherArr = userRoutes.filter(item => item.parentId) anotherArr.forEach(item => { oneArr.forEach(obj => { if (item.parentId == obj.id) { //如果匹配 說明找到父級,直接push到父級的child里面 if (!obj.child.filter(k => k.id == item.id).length) { obj.child.push(item) } } else { //如果沒有,說明本級路由沒有找到,去下一級別路由找父級 路由級別:1級路由,2級路由,3級路由...... dispatch('recurrArr', {arr: oneArr, items: item}) } }) }) commit('setState', {state: 'userRoutes', value: userRoutes}) commit('setState', {state: 'userMenus', value: oneArr}) return {code: 1, data: userRoutes} //處理完成后返回 oneArr是遞歸處理后嵌套的,userRoutes是獲取到component來渲染route的 } else { return {code: 0} } }, // 遞歸找自己的parentId recurrArr: ({dispatch}, {arr, items}) => { if (!arr) { return } for(let i = 0; i < arr.length; i ++ ){ let item = arr[i] if (item.id == items.parentId) { if (!item.child.filter(k => items.id == k.id).length) { item.child.push(items) } break; } else { dispatch('recurrArr', {arr: item.child, items: items}) } } } |
到現在為止,路由以及菜單的數據,就已經處理完了,剩下的就是addRoutes添加到route路由里面,這樣頁面就可以跳轉了~
我們接著來看登錄:
|
1
2
3
4
5
6
7
8
9
10
11
12
13
14
15
16
17
18
|
// 登錄 login: async ({ commit, dispatch}, params) => { let result = await axios('/api/login', {params}) if(result.data.code > 0) { // 登錄成功以后 獲取當前用戶權限路由 let userRoutes = await dispatch('getMenu') if (userRoutes.code > 0) { // 把請求回來的路由動態添加到 route 里 router.addRoutes(userRoutes.data) // 添加完成后,現在可以跳轉到首頁了~ router.push('/home') } return {code: 1, data: result.data} } else { console.log(result.data.msg) return {code: 0} } }, |
現在就已經大功告成了,你的項目可以進行正常的登錄、跳轉、動態更新路由等操作了~
但是
現在還差最后一步,退出登錄
因為在axios攔截里面,token失效后會調用退出接口
|
1
2
3
4
5
6
7
8
9
10
11
12
13
14
15
16
17
18
19
20
21
|
axios.interceptors.response.use( response => { if (response.status === 200) { // 身份驗證失敗 if(response.data.code === -1) { // 執行退出登錄 store.dispatch('global/loginOut') } else { // 如果請求頭里有token let token = response.headers.token if(token) { localStorage.setItem('token', token) axios.defaults.headers.token = token } } return Promise.resolve(response) } else { return Promise.reject(response) } }) |
所以才會提到開頭說:剛打開頁面的時候,不管有沒有登錄,都去請求菜單接口。
如果沒有登錄,則會調用退出登錄接口,給路由設置默認路由。
|
1
2
3
4
5
6
7
8
9
10
11
12
13
14
15
16
|
// 退出登錄loginOut: async ({ state }) => { // 退出登錄清空 token 和 headers 里面的 token localStorage.removeItem('token') delete axios.defaults.headers.token // 退出登錄要動態添加 登錄頁面 和 * 重定向頁面 let errRoutes = state.allRoutes.filter(item => item.path == '*') errRoutes.push(state.allRoutes.filter(res => errRoutes[0].redirect == res.path)[0]) router.addRoutes(errRoutes); router.currentRoute.path !== '/demo' ? router.push("/demo") : null let result = await axios('/api/loginOut', {params: {userId: state.userId}}) if(result.data.code !== 1) { console.log('退出登錄接口異常') }}, |
到現在為止,有項目就算大功告成了~
到此這篇關于Vue 簡單實現前端權限控制的示例的文章就介紹到這了,更多相關Vue 前端權限控制內容請搜索服務器之家以前的文章或繼續瀏覽下面的相關文章希望大家以后多多支持服務器之家!
原文鏈接:https://juejin.cn/post/6909739109359550471


