scikit-learn 是基于 python 語言的機器學習工具
- 簡單高效的數據挖掘和數據分析工具
- 可供大家在各種環境中重復使用
- 建立在 numpy ,scipy 和 matplotlib 上
- 開源,可商業使用 - bsd許可證
sklearn 中文文檔:http://www.scikitlearn.com.cn/
官方文檔:http://scikit-learn.org/stable/
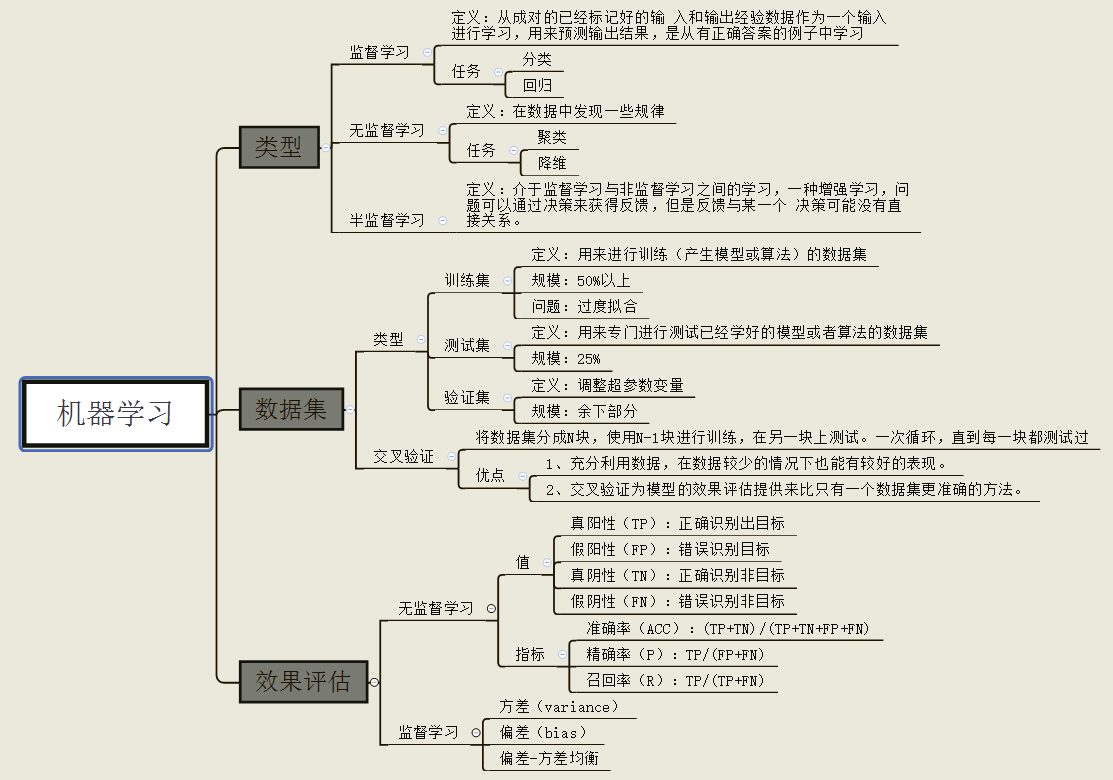
sklearn官方文檔的類容和結構如下:

sklearn是基于numpy和scipy的一個機器學習算法庫,設計的非常優雅,它讓我們能夠使用同樣的接口來實現所有不同的算法調用。
sklearn庫的四大機器學習算法:分類,回歸,聚類,降維。其中:
- 常用的回歸:線性、決策樹、svm、knn ;集成回歸:隨機森林、adaboost、gradientboosting、bagging、extratrees
- 常用的分類:線性、決策樹、svm、knn,樸素貝葉斯;集成分類:隨機森林、adaboost、gradientboosting、bagging、extratrees
- 常用聚類:k均值(k-means)、層次聚類(hierarchical clustering)、dbscan
- 常用降維:lineardiscriminantanalysis、pca
還包含了特征提取、數據處理和模型評估三大模塊。
同時sklearn內置了大量數據集,節省了獲取和整理數據集的時間。
使用sklearn進行機器學習的步驟一般分為:導入模塊-創建數據-建立模型-訓練-預測五步。
以下為代碼筆記
|
1
2
3
4
5
6
7
8
9
10
11
12
13
14
15
16
17
18
19
20
21
22
23
24
25
26
27
28
29
30
31
32
33
34
35
36
37
38
39
40
41
42
43
44
45
46
47
48
49
50
51
52
53
54
55
56
57
58
59
60
61
62
63
64
65
66
67
68
69
70
71
72
73
74
75
76
77
78
79
80
81
82
83
84
85
86
87
88
89
90
91
92
93
94
95
96
97
98
99
100
101
102
103
104
105
106
107
108
109
110
111
112
113
114
115
116
117
118
119
120
121
122
123
124
125
126
127
128
129
130
131
132
133
134
135
136
137
138
139
140
141
142
143
144
145
146
147
148
149
150
151
152
153
154
155
156
157
158
159
160
161
162
163
164
165
166
167
168
169
170
171
172
173
174
175
176
177
178
179
180
181
182
183
184
185
186
187
188
189
190
191
192
193
194
195
196
197
198
199
200
201
202
203
204
205
206
207
208
209
210
211
212
213
214
215
216
217
218
219
220
221
222
223
224
225
226
227
228
229
230
231
232
233
234
235
236
237
238
239
240
241
242
243
244
245
246
247
248
249
250
251
252
253
254
255
256
257
258
259
260
261
262
263
264
265
266
267
268
269
270
271
272
273
274
275
276
277
278
279
280
|
一、數據獲取*****************""" ##1.1 導入sklearn數據集from sklearn import datasets iris = datasets.load.iris() #導入數據集x = iris.data #獲得其特征向量y = iris.target # 獲得樣本label ##1.2 創建數據集from sklearn.datasets.samples_generator import make_classification x, y = make_classification(n_samples=6, n_features=5, n_informative=2, n_redundant=2, n_classes=2, n_clusters_per_class=2, scale=1.0, random_state=20) # n_samples:指定樣本數# n_features:指定特征數# n_classes:指定幾分類# random_state:隨機種子,使得隨機狀可重 # 查看數據集for x_,y_ in zip(x,y): print(y_,end=': ') print(x_)"""0: [-0.6600737 -0.0558978 0.82286793 1.1003977 -0.93493796]1: [ 0.4113583 0.06249216 -0.90760075 -1.41296696 2.059838 ]1: [ 1.52452016 -0.01867812 0.20900899 1.34422289 -1.61299022]0: [-1.25725859 0.02347952 -0.28764782 -1.32091378 -0.88549315]0: [-3.28323172 0.03899168 -0.43251277 -2.86249859 -1.10457948]1: [ 1.68841011 0.06754955 -1.02805579 -0.83132182 0.93286635]""" """*****************二、數據預處理*****************"""from sklearn import preprocessing ##2.1 數據歸一化data = [[0, 0], [0, 0], [1, 1], [1, 1]]# 1. 基于mean和std的標準化scaler = preprocessing.standardscaler().fit(train_data)scaler.transform(train_data)scaler.transform(test_data) # 2. 將每個特征值歸一化到一個固定范圍scaler = preprocessing.minmaxscaler(feature_range=(0, 1)).fit(train_data)scaler.transform(train_data)scaler.transform(test_data)#feature_range: 定義歸一化范圍,注用()括起來 #2.2 正則化x = [[ 1., -1., 2.], [ 2., 0., 0.], [ 0., 1., -1.]]x_normalized = preprocessing.normalize(x, norm='l2') print(x_normalized)""" array([[ 0.40..., -0.40..., 0.81...], [ 1. ..., 0. ..., 0. ...], [ 0. ..., 0.70..., -0.70...]])""" ## 2.3 one-hot編碼data = [[0, 0, 3], [1, 1, 0], [0, 2, 1], [1, 0, 2]]encoder = preprocessing.onehotencoder().fit(data)enc.transform(data).toarray() """*****************三、數據集拆分*****************"""# 作用:將數據集劃分為 訓練集和測試集# 格式:train_test_split(*arrays, **options)from sklearn.mode_selection import train_test_split x_train, x_test, y_train, y_test = train_test_split(x, y, test_size=0.3, random_state=42)"""參數---arrays:樣本數組,包含特征向量和標簽 test_size: float-獲得多大比重的測試樣本 (默認:0.25) int - 獲得多少個測試樣本 train_size: 同test_size random_state: int - 隨機種子(種子固定,實驗可復現) shuffle - 是否在分割之前對數據進行洗牌(默認true) 返回---分割后的列表,長度=2*len(arrays), (train-test split)""" """*****************四、定義模型*****************"""## 模型常用屬性和工鞥呢# 擬合模型model.fit(x_train, y_train)# 模型預測model.predict(x_test) # 獲得這個模型的參數model.get_params()# 為模型進行打分model.score(data_x, data_y) # 線性回歸:r square; 分類問題: acc ## 4.1 線性回歸from sklearn.linear_model import linearregression# 定義線性回歸模型model = linearregression(fit_intercept=true, normalize=false, copy_x=true, n_jobs=1)"""參數--- fit_intercept:是否計算截距。false-模型沒有截距 normalize: 當fit_intercept設置為false時,該參數將被忽略。 如果為真,則回歸前的回歸系數x將通過減去平均值并除以l2-范數而歸一化。 n_jobs:指定線程數""" ## 4.2 邏輯回歸from sklearn.linear_model import logisticregression# 定義邏輯回歸模型model = logisticregression(penalty='l2', dual=false, tol=0.0001, c=1.0, fit_intercept=true, intercept_scaling=1, class_weight=none, random_state=none, solver='liblinear', max_iter=100, multi_class='ovr', verbose=0, warm_start=false, n_jobs=1) """參數--- penalty:使用指定正則化項(默認:l2) dual: n_samples > n_features取false(默認) c:正則化強度的反,值越小正則化強度越大 n_jobs: 指定線程數 random_state:隨機數生成器 fit_intercept: 是否需要常量""" ## 4.3 樸素貝葉斯算法nbfrom sklearn import naive_bayesmodel = naive_bayes.gaussiannb() # 高斯貝葉斯model = naive_bayes.multinomialnb(alpha=1.0, fit_prior=true, class_prior=none)model = naive_bayes.bernoullinb(alpha=1.0, binarize=0.0, fit_prior=true, class_prior=none)"""文本分類問題常用multinomialnb參數--- alpha:平滑參數 fit_prior:是否要學習類的先驗概率;false-使用統一的先驗概率 class_prior: 是否指定類的先驗概率;若指定則不能根據參數調整 binarize: 二值化的閾值,若為none,則假設輸入由二進制向量組成""" ## 4.4 決策樹dtfrom sklearn import treemodel = tree.decisiontreeclassifier(criterion='gini', max_depth=none, min_samples_split=2, min_samples_leaf=1, min_weight_fraction_leaf=0.0, max_features=none, random_state=none, max_leaf_nodes=none, min_impurity_decrease=0.0, min_impurity_split=none, class_weight=none, presort=false)"""參數--- criterion :特征選擇準則gini/entropy max_depth:樹的最大深度,none-盡量下分 min_samples_split:分裂內部節點,所需要的最小樣本樹 min_samples_leaf:葉子節點所需要的最小樣本數 max_features: 尋找最優分割點時的最大特征數 max_leaf_nodes:優先增長到最大葉子節點數 min_impurity_decrease:如果這種分離導致雜質的減少大于或等于這個值,則節點將被拆分。""" ## 4.5 支持向量機from sklearn.svm import svcmodel = svc(c=1.0, kernel='rbf', gamma='auto')"""參數--- c:誤差項的懲罰參數c gamma: 核相關系數。浮點數,if gamma is ‘auto' then 1/n_features will be used instead.""" ## 4.6 k近鄰算法 knnfrom sklearn import neighbors#定義knn分類模型model = neighbors.kneighborsclassifier(n_neighbors=5, n_jobs=1) # 分類model = neighbors.kneighborsregressor(n_neighbors=5, n_jobs=1) # 回歸"""參數--- n_neighbors: 使用鄰居的數目 n_jobs:并行任務數""" ## 4.7 多層感知機from sklearn.neural_network import mlpclassifier# 定義多層感知機分類算法model = mlpclassifier(activation='relu', solver='adam', alpha=0.0001)"""參數--- hidden_layer_sizes: 元祖 activation:激活函數 solver :優化算法{‘lbfgs', ‘sgd', ‘adam'} alpha:l2懲罰(正則化項)參數。""" """*****************五、模型評估與選擇*****************""" ## 5.1 交叉驗證from sklearn.model_selection import cross_val_scorecross_val_score(model, x, y=none, scoring=none, cv=none, n_jobs=1)"""參數--- model:擬合數據的模型 cv : k-fold scoring: 打分參數-‘accuracy'、‘f1'、‘precision'、‘recall' 、‘roc_auc'、'neg_log_loss'等等""" ## 5.2 檢驗曲線from sklearn.model_selection import validation_curvetrain_score, test_score = validation_curve(model, x, y, param_name, param_range, cv=none, scoring=none, n_jobs=1)"""參數--- model:用于fit和predict的對象 x, y: 訓練集的特征和標簽 param_name:將被改變的參數的名字 param_range: 參數的改變范圍 cv:k-fold 返回值--- train_score: 訓練集得分(array) test_score: 驗證集得分(array)""" """*****************六、保存模型*****************"""## 6.1 保存為pickle文件import pickle # 保存模型with open('model.pickle', 'wb') as f: pickle.dump(model, f) # 讀取模型with open('model.pickle', 'rb') as f: model = pickle.load(f)model.predict(x_test) ## 6.2 sklearn方法自帶joblibfrom sklearn.externals import joblib # 保存模型joblib.dump(model, 'model.pickle') #載入模型model = joblib.load('model.pickle') |
以上就是python機器學習工具scikit-learn的使用筆記的詳細內容,更多關于python機器學習工具scikit-learn的資料請關注服務器之家其它相關文章!
原文鏈接:https://www.cnblogs.com/aitree/p/14331551.html


