之前我在這篇文章VsCode插件開發之插件初步通信
通過插件完成通信,這回我還是通過插件,只不過方式主要以在ts文件里面使用webview來進行通信。
另外在此聲明,一定要好好看仔細看官方文檔,國內關于VsCode相關的開發,少之又少,雖然有一個叫小茗同學寫的相對較全面,但是大家可以仔細看,其實他的內容大多也來自官方,同時有部分也加上自己的理解和想法。個人建議,關于VsCode插件相關的,最好是跑一跑VsCode相關官方例子,這樣有助于對VsCode插件開發有一個大致的思路和全局認識,換言之有一個感性的認識。
官方文檔地址:https://code.visualstudio.com/api
官方插件例子:https://github.com/Microsoft/vscode-extension-samples
引用官方的說明:
webview API允許擴展在Visual Studio Code中創建完全可自定義的視圖。例如,內置的Markdown擴展程序使用Web視圖來呈現Markdown預覽。Web視圖還可用于構建復雜的用戶界面,超出VsCode的本機API支持。
將webview視為iframe擴展程序控制的Vs代碼內部。webview幾乎可以呈現此框架中的任何HTML內容,并使用消息傳遞與擴展進行通信。這種自由使得webview非常強大,并開辟了一系列全新的擴展可能性。
官方對于是否應該使用webview需要考慮這么幾個方面?
第一,這個功能真的需要存在于VsCode中嗎?作為單獨的APP或者網站是否會更好?
第二,webview是實現功能的唯一方法嗎?可以使用常規 Vs Code API嗎?
第三,webview會增加足夠的用戶價值來證明其高資源成本嗎?
在我看來,如果是在VsCode內部進行增加webview,可能導致某種混亂或者不利的影響,還不如直接通過插件開發來進行分離完成功能,這樣既解耦又對VsCode本身影響不會太大。
官方的Demo:https://github.com/Microsoft/vscode-extension-samples/blob/master/webview-sample
官方講解:https://code.visualstudio.com/api/extension-guides/webview
上面我說過跑官方的例子有助于更好的認識,同時對于學習信心的提升也有很大的幫助,同時你可以在此基礎上改,從而讓你對其認識更加深刻。
項目結構(以項目結構中的組成來講解)
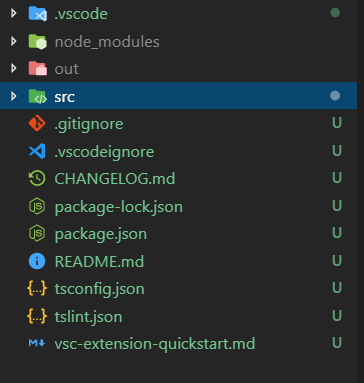
目錄的作用分別如下:
.vscode 運行所必須,同時也包括一些用戶區和工作區設置(注意,用戶區設置優于工作區設置)
node_modules node.js的依賴庫
out 編譯輸出目錄(ts編譯成功會輸出對應的js)
src 源文件所在目錄(主要是ts文件,當然了也可能是ts,就看你插件開發時,選擇的是js還是ts)
.gitignore git提交時排除一些無關緊要的(java maven項目對于一些target文件中.class是沒必要提交到git倉庫的)
.vscodeignore
如圖所示:
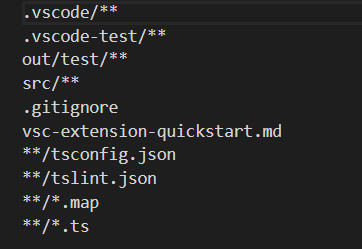
我覺得它的作用和.gitignore是一樣的,之所以存在它,是因為要防止.gitignore不生效的緣故吧(以之前項目開發經歷來說,有的時候確實存在.gitignore無效問題)。
當然了,這些源于我個人的看法,github上有關于這個的討論,感興趣的可以參考:https://github.com/Microsoft/vscode-vsce/issues/12
有不少外國開發者們在這里提自己的看法。
package-lock.json 通過這個是執行npm install 產生的 package-lock.json顧名思義,主要的作用是鎖定安裝依賴的版本,保持版本一致性。
package.json 從node.js的角度來說它是一個模塊描述文件(包含安裝模塊所需的依賴聲明及其版本號、作者名、描述等。
以小茗同學的package.json來講解,這個文件里面的內容作用分別為如下(大家可以做一個參考,實際情況根據需求而定):
|
1
2
3
4
5
6
7
8
9
10
11
12
13
14
15
16
17
18
19
20
21
22
23
24
25
26
27
28
29
30
31
32
33
34
35
36
37
38
39
40
41
42
43
44
45
46
47
48
49
50
51
52
53
54
55
56
57
58
59
60
61
62
63
64
65
66
67
68
69
70
71
72
73
74
75
76
77
78
79
80
81
82
83
84
85
86
87
88
89
90
91
92
93
94
95
96
97
98
99
100
101
102
103
104
105
106
107
108
109
110
111
112
113
114
115
116
117
118
119
120
121
122
123
124
125
126
127
128
129
130
131
132
133
134
135
136
137
138
139
140
141
142
143
144
145
146
147
148
149
150
151
152
153
154
155
156
157
158
159
160
161
162
163
164
165
166
167
168
169
170
171
172
173
174
175
176
177
178
179
180
181
182
183
184
185
186
187
188
189
190
191
192
193
194
195
|
{ // 插件的名字,應全部小寫,不能有空格 "name": "vscode-plugin-demo", // 插件的友好顯示名稱,用于顯示在應用市場,支持中文 "displayName": "VSCode插件demo", // 描述 "description": "VSCode插件demo集錦", // 關鍵字,用于應用市場搜索 "keywords": ["vscode", "plugin", "demo"], // 版本號 "version": "1.0.0", // 發布者,如果要發布到應用市場的話,這個名字必須與發布者一致 "publisher": "sxei", // 表示插件最低支持的vscode版本 "engines": { "vscode": "^1.27.0" }, // 插件應用市場分類,可選值: [Programming Languages, Snippets, Linters, Themes, Debuggers, Formatters, Keymaps, SCM Providers, Other, Extension Packs, Language Packs] "categories": [ "Other" ], // 插件圖標,至少128x128像素 "icon": "images/icon.png", // 擴展的激活事件數組,可以被哪些事件激活擴展,后文有詳細介紹 "activationEvents": [ "onCommand:extension.sayHello" ], // 插件的主入口 "main": "./src/extension", // 貢獻點,整個插件最重要最多的配置項 "contributes": { // 插件配置項 "configuration": { "type": "object", // 配置項標題,會顯示在vscode的設置頁 "title": "vscode-plugin-demo", "properties": { // 這里我隨便寫了2個設置,配置你的昵稱 "vscodePluginDemo.yourName": { "type": "string", "default": "guest", "description": "你的名字" }, // 是否在啟動時顯示提示 "vscodePluginDemo.showTip": { "type": "boolean", "default": true, "description": "是否在每次啟動時顯示歡迎提示!" } } }, // 命令 "commands": [ { "command": "extension.sayHello", "title": "Hello World" } ], // 快捷鍵綁定 "keybindings": [ { "command": "extension.sayHello", "key": "ctrl+f10", "mac": "cmd+f10", "when": "editorTextFocus" } ], // 菜單 "menus": { // 編輯器右鍵菜單 "editor/context": [ { // 表示只有編輯器具有焦點時才會在菜單中出現 "when": "editorFocus", "command": "extension.sayHello", // navigation是一個永遠置頂的分組,后面的@6是人工進行組內排序 "group": "navigation@6" }, { "when": "editorFocus", "command": "extension.demo.getCurrentFilePath", "group": "navigation@5" }, { // 只有編輯器具有焦點,并且打開的是JS文件才會出現 "when": "editorFocus && resourceLangId == javascript", "command": "extension.demo.testMenuShow", "group": "z_commands" }, { "command": "extension.demo.openWebview", "group": "navigation" } ], // 編輯器右上角圖標,不配置圖片就顯示文字 "editor/title": [ { "when": "editorFocus && resourceLangId == javascript", "command": "extension.demo.testMenuShow", "group": "navigation" } ], // 編輯器標題右鍵菜單 "editor/title/context": [ { "when": "resourceLangId == javascript", "command": "extension.demo.testMenuShow", "group": "navigation" } ], // 資源管理器右鍵菜單 "explorer/context": [ { "command": "extension.demo.getCurrentFilePath", "group": "navigation" }, { "command": "extension.demo.openWebview", "group": "navigation" } ] }, // 代碼片段 "snippets": [ { "language": "javascript", "path": "./snippets/javascript.json" }, { "language": "html", "path": "./snippets/html.json" } ], // 自定義新的activitybar圖標,也就是左側側邊欄大的圖標 "viewsContainers": { "activitybar": [ { "id": "beautifulGirl", "title": "美女", "icon": "images/beautifulGirl.svg" } ] }, // 自定義側邊欄內view的實現 "views": { // 和 viewsContainers 的id對應 "beautifulGirl": [ { "id": "beautifulGirl1", "name": "國內美女" }, { "id": "beautifulGirl2", "name": "國外美女" }, { "id": "beautifulGirl3", "name": "人妖" } ] }, // 圖標主題 "iconThemes": [ { "id": "testIconTheme", "label": "測試圖標主題", "path": "./theme/icon-theme.json" } ] }, // 同 npm scripts "scripts": { "postinstall": "node ./node_modules/vscode/bin/install", "test": "node ./node_modules/vscode/bin/test" }, // 開發依賴 "devDependencies": { "typescript": "^2.6.1", "vscode": "^1.1.6", "eslint": "^4.11.0", "@types/node": "^7.0.43", "@types/mocha": "^2.2.42" }, // 后面這幾個應該不用介紹了 "license": "SEE LICENSE IN LICENSE.txt", "bugs": { "url": "https://github.com/sxei/vscode-plugin-demo/issues" }, "repository": { "type": "git", "url": "https://github.com/sxei/vscode-plugin-demo" }, // 主頁 "homepage": "https://github.com/sxei/vscode-plugin-demo/blob/master/README.md"} |
目前我改寫的官方demo的package.json文件為如下:
|
1
2
3
4
5
6
7
8
9
10
11
12
13
14
15
16
17
18
19
20
21
22
23
24
25
26
27
28
29
30
31
32
33
34
35
36
37
38
39
40
41
42
43
|
{ "name": "helloworld", "displayName": "HelloWorld", "description": "", "version": "0.0.1", "engines": { "vscode": "^1.30.0" }, "categories": [ "Other" ], "activationEvents": [ "onCommand:extension.helloWorld", "onCommand:extension.loginValidate" ], "main": "./out/loginValidate", "contributes": { "commands": [ { "command": "extension.helloWorld", "title": "登錄" }, { "command": "extension.loginValidate", "title": "登錄驗證" } ] }, "scripts": { "vscode:prepublish": "npm run compile", "compile": "tsc -p ./", "watch": "tsc -watch -p ./", "postinstall": "node ./node_modules/vscode/bin/install", "test": "npm run compile && node ./node_modules/vscode/bin/test" }, "devDependencies": { "typescript": "^3.1.4", "vscode": "^1.1.25", "tslint": "^5.8.0", "@types/node": "^8.10.25", "@types/mocha": "^2.2.42" }} |
兩者對比,后者更簡單。
注意:其中我主要改寫官方的這一部分
|
1
2
3
4
5
6
7
8
9
10
11
12
13
14
15
16
17
|
"activationEvents": [ "onCommand:extension.helloWorld", "onCommand:extension.loginValidate" ], "main": "./out/loginValidate", "contributes": { "commands": [ { "command": "extension.helloWorld", "title": "登錄" }, { "command": "extension.loginValidate", "title": "登錄驗證" } ] }, |
這一部分分別對應extension.ts和loginValidate.ts,如下圖所示:
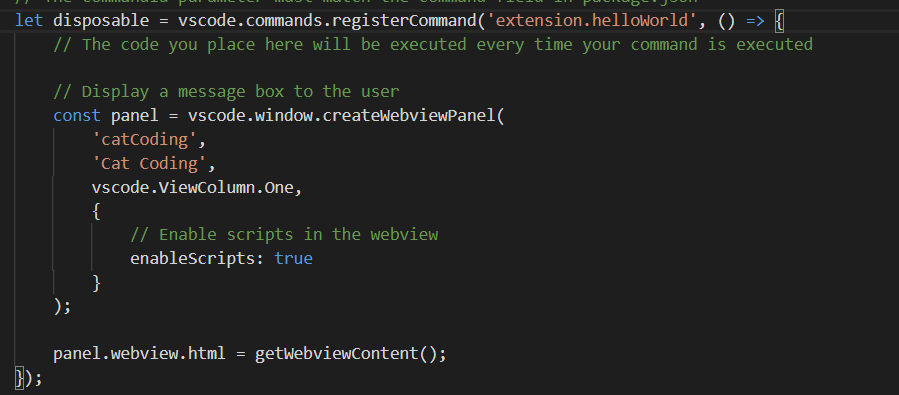

大家可以看到,其實兩者區別并不大,主要的差異還是registerCommand括號里面的。
有朋友也行會疑惑這個是什么意思不太明白。
registerCommand主要是注冊命令,這個注冊命令與圖中的一致:
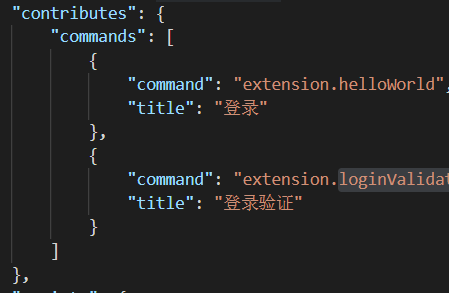
保持一致的話,就能F5運行插件項目打開一個新的窗口(可理解為是插件),通過快捷鍵ctrl+shift+p就可以看到如圖:
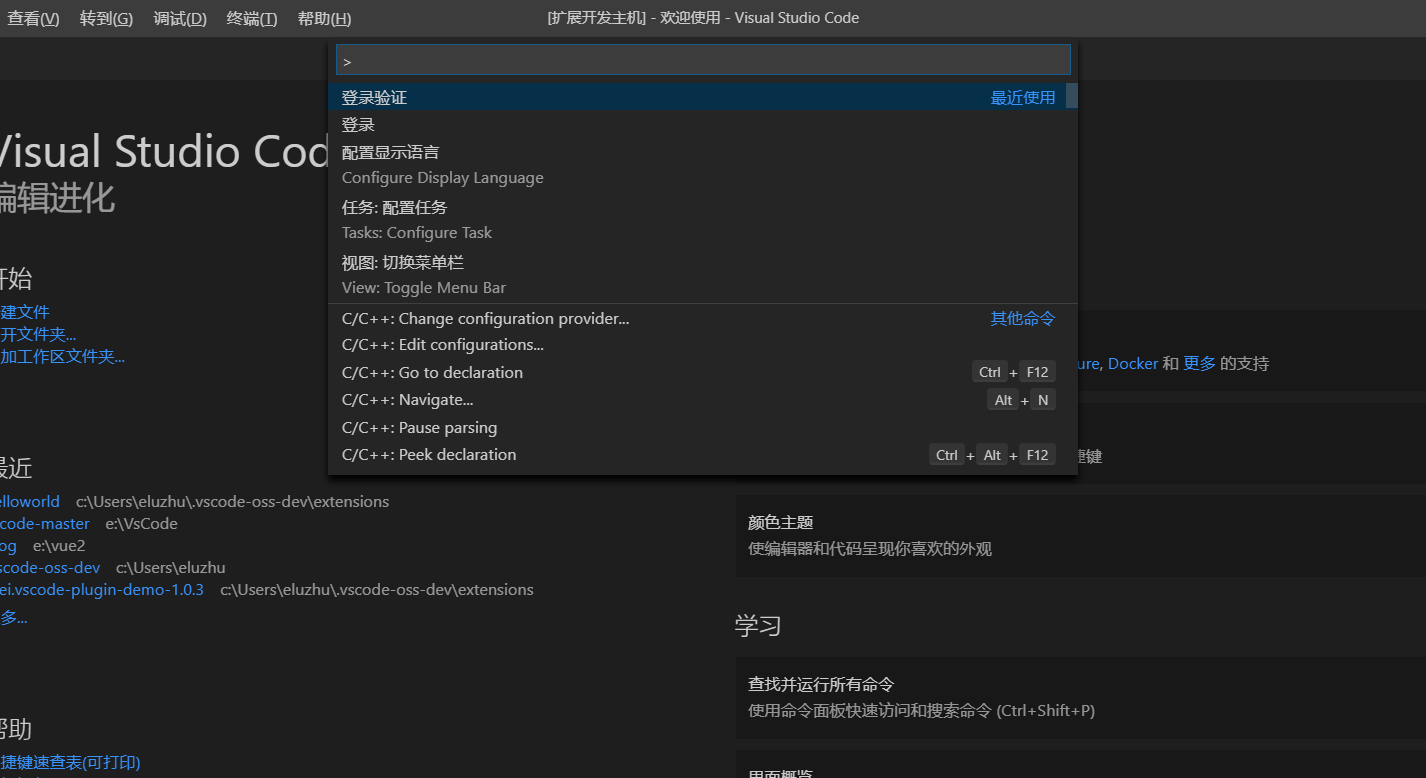
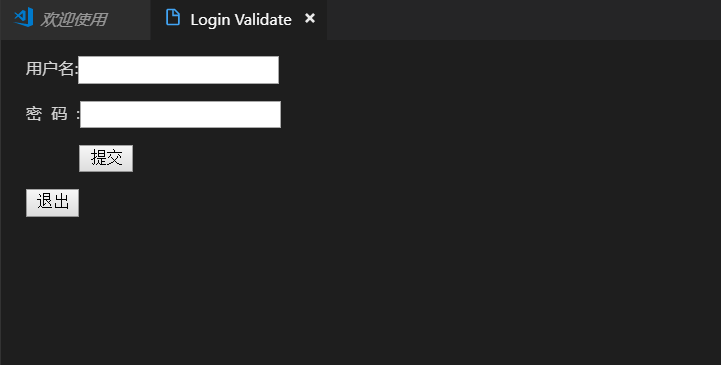
點擊這個登錄驗證回車,即可出現如下webview視圖
對了還有一點要強調一下,目前有個小局限性就是不能命令有一定的限制,主要是因為這個地方:
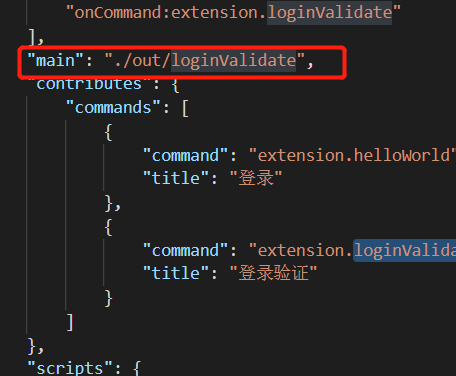
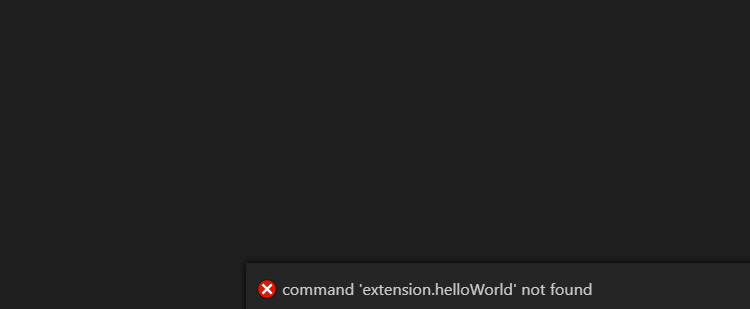
由于指定該主函數,所以只能對應的loginValidate.js起作用,所以extension.js就不能起作用了,如果你要強行點擊登錄就會出現命令找不到,如圖所示:
tsconfig.json
雖然有詳解不過我還是要說一下,如果一個目錄下存在一個tsconfig.json文件,那么它意味著這個目錄是TypeScript項目的根目錄。tsconfig.json文件中指定了用來編譯這個項目的根文件和編譯選項。
tslint.json 主要用于typescript的語法檢查
最后貼一下我的loginValidate.ts代碼(extension.ts代碼就不貼了,前面說到過它們的區別,基本上是大同小異):
loginValidate.ts
|
1
2
3
4
5
6
7
8
9
10
11
12
13
14
15
16
17
18
19
20
21
22
23
24
25
26
27
28
29
30
31
32
33
34
35
36
37
38
39
40
41
42
43
44
45
46
47
48
49
50
51
52
53
54
55
56
57
58
59
60
61
62
63
64
65
66
67
68
69
70
71
72
73
74
75
76
77
78
79
80
81
82
83
84
|
// The module 'vscode' contains the VS Code extensibility API// Import the module and reference it with the alias vscode in your code belowimport * as vscode from 'vscode';// this method is called when your extension is activated// your extension is activated the very first time the command is executedexport function activate(context: vscode.ExtensionContext) { // Use the console to output diagnostic information (console.log) and errors (console.error) // This line of code will only be executed once when your extension is activated console.log('Congratulations, your extension "loginValidate" is now active!'); // The command has been defined in the package.json file // Now provide the implementation of the command with registerCommand // The commandId parameter must match the command field in package.json let disposable = vscode.commands.registerCommand('extension.loginValidate', () => { // The code you place here will be executed every time your command is executed // Display a message box to the user const panel = vscode.window.createWebviewPanel( 'catCoding', 'Login Validate', vscode.ViewColumn.One, { // Enable scripts in the webview enableScripts: true } ); panel.webview.html = getWebviewContent(); }); context.subscriptions.push(disposable);}// this method is called when your extension is deactivatedexport function deactivate() {}function getWebviewContent() { return `<!DOCTYPE html><html lang="en"><head> <meta charset="UTF-8"> <meta name="viewport" content="width=device-width, initial-scale=1.0"> <title>登錄</title></head><body><div id="form"><form id="login"> <p>用戶名:<input type="text" id="userName" style="color:black;"/></p> <p>密 碼 :<input type="password" id="password" style="color:black;"/></p> <p> <input type="button" style="color:black;" value="提交" onclick="test()"/></form><div id="register"><input type="button" value="退出" onclick="exits()"/></div></div> <script> function test(){ var xhr = new XMLHttpRequest(); xhr.onreadystatechange = function () { if (xhr.readyState == 4) { if ((xhr.status >= 200 && xhr.status < 300) || xhr.status == 304) { console.log(xhr.responseText); $("#login).hide(); } else { console.log(xhr.responseText); } } }; xhr.open("POST", "http://localhost:8080/test-web/sysUser/queryUserCodeByInfo?userCode=2", true); xhr.send(null); } function exits(){ $("#login").show();} </script></body></html>`;} |
另外關于通信方面的,目前可以在此使用原生javascript的ajax,這個webview相當于html,那么就可以在里面引用其它的前端組件來借此實現某個功能,但是請注意,可能會有一定的限制,比如不能使用alert這種彈框方式。
另外建議編寫webview的時候,特別是編寫里面的html,最好在外面編寫,直接使用瀏覽器運行沒有問題,然后再嵌入進去,這樣有助于排除一些不必要的錯誤,利于效率的提高。
今天寫到這吧,后面筆者會分享有關于vscode二次開發更多的知識。本次分享出來,希望能夠給小伙伴們帶來幫助。也希望大家多多支持服務器之家。
原文鏈接:https://www.cnblogs.com/youcong/p/10322078.html


