如何利用Visual studio 2010創建一個ASP網站?
【文件】-->【新建】-->【網站】-->【ASP.Net網站】--【完成】

默認頁面Default.aspx
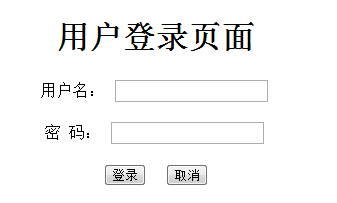
創建以上界面:
|
1
2
3
4
5
6
7
8
9
10
11
12
13
14
15
16
17
18
19
20
21
22
23
24
25
26
|
<%@ Page Language="C#" AutoEventWireup="true" CodeFile="UserLogin.aspx.cs" Inherits="UserLogin" %> <!DOCTYPE html PUBLIC "-//W3C//DTD XHTML 1.0 Transitional//EN" "http://www.w3.org/TR/xhtml1/DTD/xhtml1-transitional.dtd"> <html xmlns="http://www.w3.org/1999/xhtml"> <head runat="server"> <title></title> </head> <body> <div align="center"> <h1>用戶登錄頁面</h1> <form id="form1" runat="server"> <p> <asp:Label ID="lbusername" runat="server">用戶名:</asp:Label> <asp:TextBox ID="tbusername" runat="server"></asp:TextBox> </p> <p> <asp:Label ID="lbpsw" runat="server">密 碼:</asp:Label> <asp:TextBox ID="tbpsw" runat="server" TextMode="Password"></asp:TextBox> </p> <p><asp:Button ID="btnLogin" runat="server" Text="登錄" onclick="btnLogin_Click" /> <asp:Button ID="btnCancel" runat="server" Text="取消" onclick="btnCancel_Click" /> </p> </form> </div> </body> </html> |
登錄驗證功能
|
1
2
3
4
5
6
7
8
9
10
11
12
13
14
15
16
17
18
19
20
21
22
23
24
25
26
27
28
29
30
31
32
33
34
35
36
37
38
39
40
|
/// <summary> /// 用戶登錄 /// </summary> /// <param name="sender"></param> /// <param name="e"></param> protected void btnLogin_Click(object sender, EventArgs e) { if (tbusername.Text == "") { Response.Write(@"<script>alert('用戶名不能為空!');</script>"); } if (tbpsw.Text == "") { Response.Write(@"<script>alert('密碼不能為空!');</script>"); } string username = tbusername.Text; string password = tbpsw.Text; string sql = "select * from T_user where username=@username and password=@password"; SqlParameter[] parameters = { new SqlParameter("@username",username), new SqlParameter("@password", password) }; using (SqlConnection conn = new SqlConnection(connstr)) { conn.Open(); using (SqlCommand cmd = conn.CreateCommand()) { cmd.CommandText = sql; cmd.Parameters.AddRange(parameters); DataSet ds = new DataSet(); SqlDataAdapter adapter = new SqlDataAdapter(cmd); adapter.Fill(ds); DataTable table = ds.Tables[0]; if(table != null) Response.Write(@"<script>alert('登錄成功!');</script>"); else Response.Write(@"<script>alert('登錄失敗!');</script>"); } } } |
注冊功能
|
1
2
3
4
5
6
7
8
9
10
11
12
13
14
15
16
17
18
19
20
21
22
23
24
|
/// <summary> /// 用戶注冊 /// </summary> /// <param name="sender"></param> /// <param name="e"></param> protected void brnRegister_Click(object sender, EventArgs e) { string username = tbusername.Text; string password = tbpsw.Text; string sql = "Insert into T_user(username, password) values(@username,@password)"; SqlParameter[] parameters = { new SqlParameter("@username", username), new SqlParameter("@password", password) }; using (SqlConnection conn = new SqlConnection(connstr)) { conn.Open(); using (SqlCommand cmd = conn.CreateCommand()) { cmd.CommandText = sql; cmd.Parameters.AddRange(parameters); cmd.ExecuteNonQuery(); } } Response.Write(@"<script>alert('注冊成功!');</script>"); } |
知識點歸納:
1.如何創建一個ASP.Net網站
2. 使用服務器控件實現界面設計
3. 對數據庫的簡單操作
一個簡單的用戶注冊、登錄就完成了,通過這個案例希望對大家的學習有所幫助。


