導言
概述插入、更新和刪除數據 里我們已經學習了如何使用GridView等控件來插入,更新刪除數據。通過ObjectDataSource和其它數據控件僅僅只需要在智能標簽里勾一下checkbox就完成了,不需要寫任何代碼。而DataList沒有這些內置的功能。我們可以使用1.x 里的方法來實現這些功能。在本章我們將看到,DataList提供了一些事件和屬性來完成我們的目的,為此我們需要寫一些代碼。
本章我們首先學習如何創建一個支持編輯和刪除數據的DataList。后面的教程里我們將學習一些高級的編輯和刪除方法,包括驗證,DAL和BLL的異常處理等。
注意:和DataList一樣,Repeater也不提供內置的這些功能。而且Repeater里沒有DataList里提供的那些事件和屬性。因此本章和后面的幾章我們僅僅只討論DataList。
第一步: 創建編輯和刪除教程頁
首先創建本章和后面幾章需要用到的頁。添加一個名為EditDeleteDataList的文件夾。然后添加下面的頁。確保每頁都包含了Site.master。
Default.aspx
Basics.aspx
BatchUpdate.aspx
ErrorHandling.aspx
UIValidation.aspx
CustomizedUI.aspx
OptimisticConcurrency.aspx
ConfirmationOnDelete.aspx
UserLevelAccess.aspx
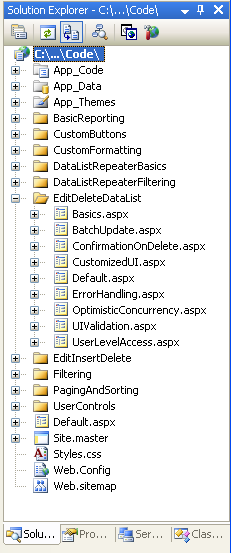
圖 1: 添加頁
和別的文件夾一樣,Default.aspx列出教程章節。記得SectionLevelTutorialListing.ascx用戶控件提供了這個功能。從解決方案里將它拖到我們的頁里。

圖 2: 添加SectionLevelTutorialListing.ascx 用戶控件
最后將這些頁添加到Web.sitemap里。在Master/Detail Reports with the DataList and Repeater<siteMapNode>之后添加下面的標記:
|
1
2
3
4
5
6
7
8
9
10
11
12
13
14
15
16
17
18
19
20
21
22
23
24
25
26
27
28
29
30
31
32
33
34
35
36
37
38
39
40
41
42
|
<siteMapNode title="Editing and Deleting with the DataList" description="Samples of Reports that Provide Editing and Deleting Capabilities" url="~/EditDeleteDataList/Default.aspx" > <siteMapNode title="Basics" description="Examines the basics of editing and deleting with the DataList control." url="~/EditDeleteDataList/Basics.aspx" /> <siteMapNode title="Batch Update" description="Examines how to update multiple records at once in a fully-editable DataList." url="~/EditDeleteDataList/BatchUpdate.aspx" /> <siteMapNode title="Error Handling" description="Learn how to gracefully handle exceptions raised during the data modification workflow." url="~/EditDeleteDataList/ErrorHandling.aspx" /> <siteMapNode title="Adding Data Entry Validation" description="Help prevent data entry errors by providing validation." url="~/EditDeleteDataList/UIValidation.aspx" /> <siteMapNode title="Customize the User Interface" description="Customize the editing user interfaces." url="~/EditDeleteDataList/CustomizedUI.aspx" /> <siteMapNode title="Optimistic Concurrency" description="Learn how to help prevent simultaneous users from overwritting one another s changes." url="~/EditDeleteDataList/OptimisticConcurrency.aspx" /> <siteMapNode title="Confirm On Delete" description="Prompt a user for confirmation when deleting a record." url="~/EditDeleteDataList/ConfirmationOnDelete.aspx" /> <siteMapNode title="Limit Capabilities Based on User" description="Learn how to limit the data modification functionality based on the user s role or permissions." url="~/EditDeleteDataList/UserLevelAccess.aspx" /></siteMapNode> |
更新了Web.sitemap后,瀏覽一下。

圖 3: 站點導航現在包含了編輯和刪除DataList 教程
第二步: 探討更新和刪除數據所要用到的技術
使用GridView來編輯和刪除數據之所以很簡單,是因為GridView和ObjectDataSource在底層非常一致。如研究插入、更新和刪除的關聯事件里所討論的,當更新按鈕被點擊時,GridView自動將字段的值賦給ObjectDataSource的UpdateParameters集合,然后激發ObjectDataSource的Update()方法。我們現在需要確保將合適的值賦給ObjectDataSource的參數,然后調用Update()方法。DataList提供了以下的屬性和事件來幫助我們完成這些:
DataKeyField property — 更新或刪除時,我們需要唯一確定DataList里的每個item。將這個屬性設為顯示的數據的主健。這樣做會產生DataList的 DataKeys collection ,每個item都有一個指定的 DataKeyField .
EditCommand event — 當CommandName屬性設為“Edit”的Button, LinkButton, 或 ImageButton 被點時激發.
CancelCommand event — 當CommandName屬性設為“Cancel”的Button, LinkButton, 或 ImageButton 被點時激發. UpdateCommand event — 當CommandName屬性設為“Update”的Button, LinkButton, 或 ImageButton 被點時激發. DeleteCommand event — 當CommandName屬性設為“Delete”的Button, LinkButton, 或 ImageButton 被點時激發.
使用以上的屬性和事件,我們有四種方法來更新和刪除數據:
使用ASP.NET 1.x 的技術— DataList先于ASP.NET 2.0 和ObjectDataSources 存在,可以直接通過編程來實現編輯和刪除。這種方法需要我們在顯示數據或者更新刪除記錄時,直接在BLL層將數據綁定到DataList。
使用一個單獨的ObjectDataSource 來實現選擇,更新和刪除 — DataList沒有GridView內置的編輯刪除功能,并不意味著我們不能添加這些功能。我們象在GridView的例子里那樣,使用 ObjectDataSource,但是在設置ObjectDataSource的參數并調用Update()方法時,需要為DataList的UpdateCommand事件創建一個 event handler。 Using an ObjectDataSource Control for Selecting, but Updating and Deleting Directly Against the BLL — 使用第二種方法時我們需要為UpdateCommand事件和參數賦值等寫一些代碼。其實我們可以用ObjectDataSource來實現selecting ,更新和刪除直接調用BLL(象第一種方法)。我的意見是,直接調用BLL會使代碼可讀性更好。 使用多個ObjectDataSources —前面的三種方法都需要一些代碼。如果你寧愿堅持使用盡可能多的聲明語法的話,最后一種方法是使用多個ObjectDataSources 。第一個ObjectDataSource 從BLL獲取數據,并綁定到 DataList. 為更新添加另一個 ObjectDataSource, 直接添加到 DataList的 EditItemTemplate.同樣對刪除也是如此。三個 ObjectDataSource通過 ControlParameters 聲明語法直接將參數綁定到ObjectDataSource 的參數 (而不是在 DataList的 UpdateCommand event handler編程處理). 這種方法也需要一些編碼 — 我們需要調用 ObjectDataSource內置的 Update() 或 Delete() — 但是比起其它三種方法,代碼少的多。這種方法的劣勢是多個 ObjectDataSources 使頁面看起來混亂。
我喜歡選擇第一種方法,因為它提供了更好的可擴展性,而設計DataList的本意就是使用這種方式。當擴展DataList使它和ASP.NET 2.0的數據源控件一起工作時,它沒有“正式”的ASP.NET 2.0數據控件( GridView, DetailsView, 和FormView)的那些可擴展性或特性。當然其它方法也不是沒有優點。
這幾章關于編輯和刪除的教程會使用ObjectDataSource 來顯示數據,然后直接調用BLL來實現編輯和刪除(第三種方法)
第三步: 添加DataList并配置它的ObjectDataSource
本章我們將創建一個DataList用來列出product的信息,并提供用戶編輯其name和price,刪除的功能。我們使用ObjectDataSource來顯示數據,調用BLL來實現更新和刪除的功能。首先我們來實現一個只讀的顯示product的頁。由于在前面的教程里已經實現過這樣的功能,在這里我們很快帶過。
打開EditDeleteDataList文件夾下的Basics.aspx頁,添加一個DataList。然后通過智能標簽創建一個ObjectDataSource。在SELECT標簽里使用ProductsBLL類的GetProducts()方法配置它。
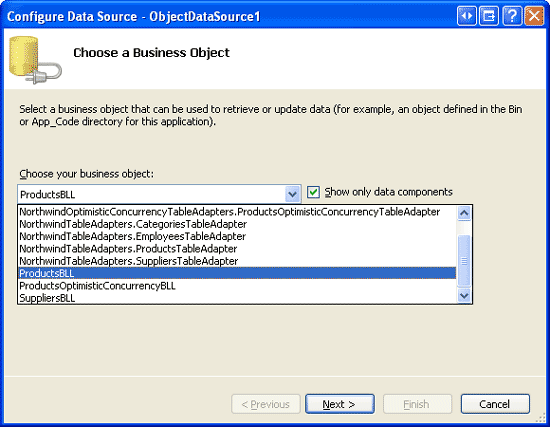
圖 4: 使用ProductBLL類配置ObjectDataSource

圖 5: 選擇GetProducts()
在INSERT,UPDATE和DELETE標簽里都選擇None。
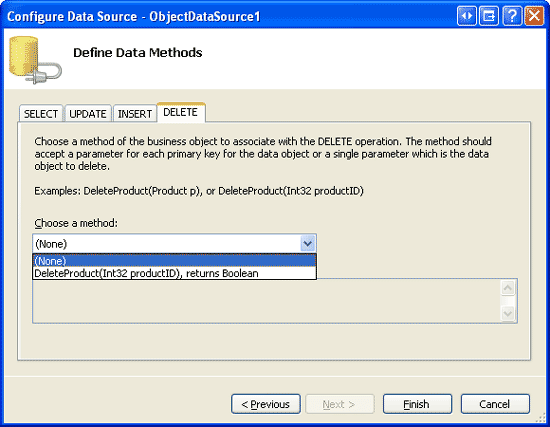
圖 6: 在INSERT, UPDATE, 和DELETE 標簽里選擇(None)
完成配置后回到設計界面。如我們在以前的例子里看到的那樣,Visual Studio 會自動創建ItemTemplate,顯示數據。將ItemTemplate改為只顯示product的name和price。然后將RepeatColumns設為2。
注意:象以前討論的那樣,當使用ObjectDataSource修改數據時,我們在聲明標記里需要移除OldValuesParameterFormatString (或重新設為缺省值,{0})。而本章ObjectDataSource僅僅只用來獲取數據,因此不需要那樣做(當然那樣做了也沒關系)。完成后你的頁代碼看起來應該和下面差不多:
|
1
2
3
4
5
6
7
8
9
10
11
12
13
14
15
16
17
|
<asp:DataList ID="DataList1" runat="server" DataKeyField="ProductID" DataSourceID="ObjectDataSource1" RepeatColumns="2"> <ItemTemplate> <h5> <asp:Label runat="server" ID="ProductNameLabel" Text='<%# Eval("ProductName") %>'></asp:Label> </h5> Price: <asp:Label runat="server" ID="Label1" Text='<%# Eval("UnitPrice", "{0:C}") %>' /> <br /> <br /> </ItemTemplate></asp:DataList><asp:ObjectDataSource ID="ObjectDataSource1" runat="server" SelectMethod="GetProducts" TypeName="ProductsBLL" OldValuesParameterFormatString="original_{0}"></asp:ObjectDataSource> |
瀏覽一下頁面。如圖7,DataList以兩列的方式顯示product的name和price。
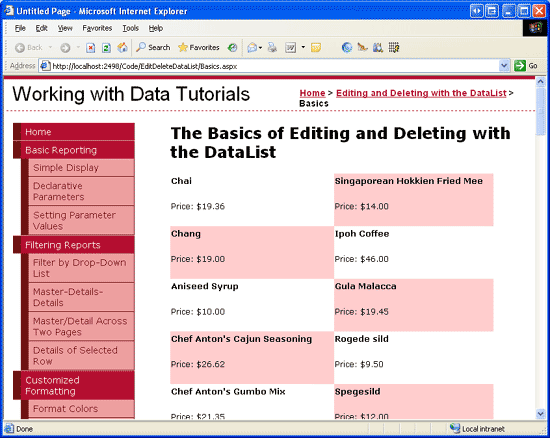
圖 7: DataList顯示Products的 Names and Prices
注意:DataList有一些屬性是編輯和刪除需要用到的,這些值都存在view state里。因此創建支持編輯和刪除功能的DataList時,DataList的view state需要開啟。
聰明的讀者應該記起來在創建可編輯的GridView,DetailsViews和FormViews的時候,view state是禁用的。這是因為ASP.NET 2.0 控件包含了control state,它在postback時狀態是連續的。
在GridView里禁用了view state僅僅只是忽略了無關緊要的狀態信息,但是維持了control state(它包含了編輯和刪除需要的狀態)。而DataList是 ASP.NET 1.x時代創建的,并沒有使用control state,因此view state必須開啟。更多的control state的目的以及和view state的區別信息見Control State vs. View State
第四步: 添加一個編輯界面
GridView控件是由字段集合組成的(BoundFields, CheckBoxFields, TemplateFields等)。這些字段能根據模式來調整標記。比如,在只讀模式下,BoundField 將字段值顯示為文本,而在編輯模式下,它將顯示為一個TextBox,這個TextBox的Text屬性被賦予字段的值。
另一方面,DataList用template來展現它的item。只讀的item用ItemTemplate來展現。而當在編輯模式下時,item用EditItemTemplate來展示。現在我們的DataList只有一個ItemTemplate。我們需要添加一個EditItemTemplate來支持編輯功能。本章我們使用TextBox來編輯product的name和price。可以通過聲明語言或設計視圖(DataList的智能標簽的EditTemplate選項)來創建EditItemTemplate。

圖 8:選擇EditItemTemplate
然后輸入“Product name:” 和“Price:” ,再拖兩個TextBox到EditItemTemplate。將TextBox的ID屬性設為ProductName和UnitPrice。

圖 9: 添加TextBox
我們需要將product的字段綁定到關聯的TextBox。在TextBox的智能標簽上點擊Edit DataBindings,然后將Text屬性和適當的字段關聯。見圖10。
注意:將UnitPrice綁定到TextBox時,你可以用({0:C})將它 格式化為貨幣值,或用({0:N})表示為普通數字,或者不格式化。

圖 10:綁定字段到TextBoxes
注意:圖10里的Edit DataBindings對話框里并不包含“雙向數據綁定”的checkbox,而在編輯GridView或DetailsVIew里的TemplateField,或者FormView里的template里時是有這個checkbox的。雙向數據綁定允許在插入或更新數據時,輸入控件的值自動賦給相關聯的ObjectDataSource的InsertParameters或UpdateParameters。DataList并不支持雙向綁定—我們在后面會看到,在用戶作出更改,準備更新數據時,我們需要編程將Textbox的Text的值傳給ProductsBLL類的UpdateProduct方法。
最后我們在EditItemTemplate里加入Update和Cancel按鈕。象前面看到的那樣,當設置了CommandName的Repeater或DataList里的Button,LinkButton或ImageButton被點擊時,Repeater或DataList的ItemCommand事件被激發。對DataList來說,如果CommandName設為某個值,另外一個事件也會被激發,如下:
“Cancel” — 激發 CancelCommand event
“Edit” — 激發 EditCommand event
“Update” — 激發UpdateCommand event
記住除了ItemCommand外,這些事件會激發。
為EditItemTemplate添加兩個Button,一個CommandName設為"Update",一個設為"Cancel"。完成后,設計界面看起來應該和下面差不多:
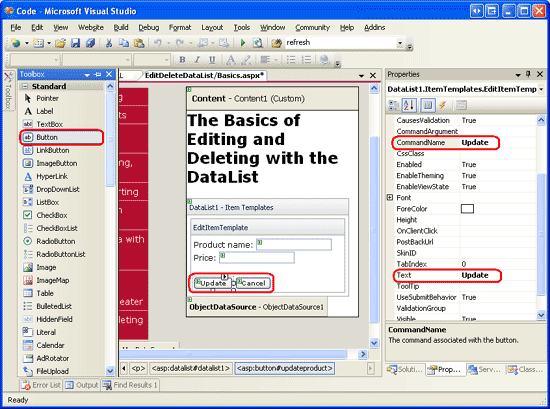
圖 11: 為 EditItemTemplate 添加Update 和Cancel 按鈕
你的標記語言看起來應該和下面差不多:
|
1
2
3
4
5
6
7
8
9
10
11
12
13
14
15
16
17
18
19
20
21
22
23
24
25
26
|
<asp:DataList ID="DataList1" runat="server" DataKeyField="ProductID" DataSourceID="ObjectDataSource1" RepeatColumns="2"> <ItemTemplate> <h5> <asp:Label runat="server" ID="ProductNameLabel" Text='<%# Eval("ProductName") %>' /> </h5> Price: <asp:Label runat="server" ID="Label1" Text='<%# Eval("UnitPrice", "{0:C}") %>' /> <br /> <br /> </ItemTemplate> <EditItemTemplate> Product name: <asp:TextBox ID="ProductName" runat="server" Text='<%# Eval("ProductName") %>' /><br /> Price: <asp:TextBox ID="UnitPrice" runat="server" Text='<%# Eval("UnitPrice", "{0:C}") %>' /><br /> <br /> <asp:Button ID="UpdateProduct" runat="server" CommandName="Update" Text="Update" /> <asp:Button ID="CancelUpdate" runat="server" CommandName="Cancel" Text="Cancel" /> </EditItemTemplate></asp:DataList> |
第五步: 添加進入編輯模式的入口
現在我們的DataList有一個編輯界面了。然而現在還沒有辦法來體現出用戶需要編輯product信息。我們需要為每個product加一個Edit button,當點擊時,將DataList item展示為編輯模式。同樣的可以通過設計器或直接聲明代碼來添加。確保將Edit button的commandName屬性設為"Edit".添加完后,瀏覽一下頁面。
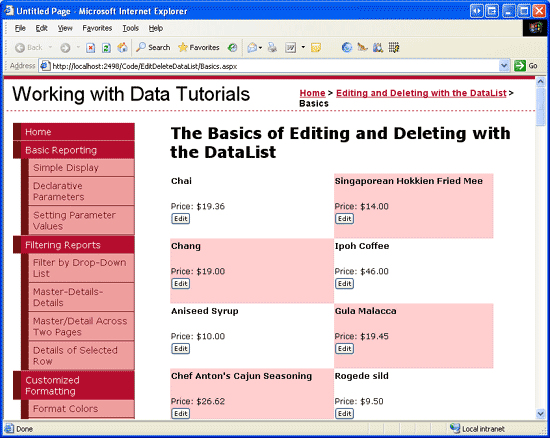
圖 12: 添加Edit Buttons
點擊button會引起postback,但是并沒有進入product的編輯模式。為了完成這個,我們需要:
設置DataList的 EditItemIndex property 為 被點擊了Edit button的 DataListItem的 index .
重新綁定數據到 DataList. 當 DataList 重新展現時, 和DataList的EditItemIndex相關的DataListItem 會展現EditItemTemplate.
由于在點Edit button時,DataList的EditCommand事件被激發,使用下面的代碼創建一個EditCommand event handler :
protected void DataList1_EditCommand(object source, DataListCommandEventArgs e)
{
// Set the DataList's EditItemIndex property to the
// index of the DataListItem that was clicked
DataList1.EditItemIndex = e.Item.ItemIndex;
// Rebind the data to the DataList
DataList1.DataBind();
}
EditCommand event handler 的第二個參數類型為DataListCommandEventArgs ,它是被點擊的Edit button的DataListItem的引用(e.Item).首先設置DataList的EditItemIndex為想編輯的DataListItem的ItemIndex,然后重新綁定數據。完成后再瀏覽頁面。點Edit button,現在product變成了可編輯的。見圖13。

圖 13: 點Edit Button 使Product 可編輯
第六步: 保存用戶的更改
現在點product的Update或Cancel button不會有任何反應。為了完成目標我們需要為DataList的UpdateCommand和CancelCommand創建event handler。首先創建CancelCommand event handler,它在product的Cancel button點擊時執行,使DataList返回編輯之前的狀態。使DataList以只讀模式展示item,我們需要:
設置DataList的 EditItemIndex property 為一個不存在的DataListItem index -1是一個好的選擇。(由于DataListItem index從0開始) 重新綁定數據到DataList。由于沒有DataListItem ItemIndex和DataList的EditItemIndex關聯,整個DataList會展現為只讀模式。 這些可以通過以下代碼完成:
|
1
2
3
4
5
6
7
|
protected void DataList1_CancelCommand(object source, DataListCommandEventArgs e){ // Set the DataList's EditItemIndex property to -1 DataList1.EditItemIndex = -1; // Rebind the data to the DataList DataList1.DataBind();} |
現在點擊Cancel button會返回到DataList編輯前的狀態。
最后我們來完成UpdateCommand event handler,我們需要:
編程獲取用戶輸入的product name和price,還有ProductID.
調用ProductsBLL類里的合適的UpdateProduct重載方法.
設置DataList的EditItemIndex property 為一個不存在的DataListItem index. -1 是一個好的選擇。
重新幫頂數據。
第一和第二步負責保存用戶的更改。第三步返回到DataList編輯前的狀態(和CancelCommand event handler一樣)。
我們需要使用FindControl方法來獲取product的name和price(當然包括ProductID)。當最初將ObjectDataSource綁定到DataList時,Visual Studio 將DataList的DataKeyField 屬性賦為數據源的主鍵值(ProductID)。這個值可以通過DataList的DataKey集合來獲取。花點時間驗證一下DataKeyField 是否設置為ProductID。
下面的代碼完成了上面的功能:
|
1
2
3
4
5
6
7
8
9
10
11
12
13
14
15
16
17
18
19
20
21
|
protected void DataList1_UpdateCommand(object source, DataListCommandEventArgs e){ // Read in the ProductID from the DataKeys collection int productID = Convert.ToInt32(DataList1.DataKeys[e.Item.ItemIndex]); // Read in the product name and price values TextBox productName = (TextBox)e.Item.FindControl("ProductName"); TextBox unitPrice = (TextBox)e.Item.FindControl("UnitPrice"); string productNameValue = null; if (productName.Text.Trim().Length > 0) productNameValue = productName.Text.Trim(); decimal? unitPriceValue = null; if (unitPrice.Text.Trim().Length > 0) unitPriceValue = Decimal.Parse(unitPrice.Text.Trim(), System.Globalization.NumberStyles.Currency); // Call the ProductsBLL's UpdateProduct method... ProductsBLL productsAPI = new ProductsBLL(); productsAPI.UpdateProduct(productNameValue, unitPriceValue, productID); // Revert the DataList back to its pre-editing state DataList1.EditItemIndex = -1; DataList1.DataBind();} |
首先從DataKeys集合里讀出product的ProductID。然后將兩個TextBox的Text屬性存起來。我們用Decimal.Parse() 方法去讀UnitPrice TextBox的值,以便在這個值有貨幣符號時可以正確的轉換。
注意:只有在TextBox的Text指定了值的情況下,productNameValue和unitPriceValue變量才會被賦值。否則,會在更新數據時使用一個NULL值。也就是說我們的代碼會將空字符串轉換為NULL值,而在GridView,DetailsView和FormView控件的編輯界面里NULL是缺省值。獲取值后,調用ProductsBLL類的UpdateProduct方法,將product的name,price和ProductID傳進去。使用和CancelCommand event handler里同樣的邏輯返回到DataList編輯前狀態。完成了EditCommand,CancelCommand和UpdateCommand event handler后,用戶可以編輯product的name和price了。見圖14。
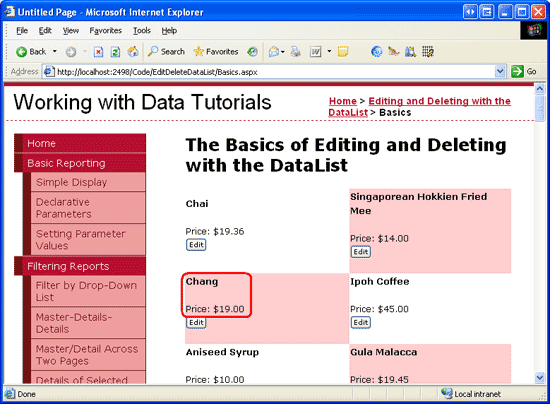
圖 14: 瀏覽頁時所有的Products都是只讀模式

圖 15: 點擊Edit Button

圖 16: 改變值后,點擊 Update返回只讀模式
第七步: 增加刪除功能
增加刪除功能的步驟和增加編輯功能差不多。簡單來說我們需要在ItemTemplate里添加一個Delete button,當點擊時:
從DataKeys 集合里讀取關聯的proudct的ProductID .
調用ProductsBLL class的DeleteProduct 方法執行刪除操作.
重新綁定數據到 DataList.
首先來增加一個Delete button.
當點擊一個CommandName為“Edit”, “Update”, 或“Cancel”的Button時,會激發DataList的ItemCommand事件和另外一個事件(比如,使用“Edit”時EditCommand 事件會被激發)。同樣的,CommandName為“Delete”時會激發DeleteCommand 事件(和ItemCommand一起)。
在Edit button后面增加一個Delete button ,將CommandName屬性設為“Delete”. 完成后聲明代碼如下:
|
1
2
3
4
5
6
7
8
9
10
11
12
13
14
15
16
|
<ItemTemplate> <h5> <asp:Label runat="server" ID="ProductNameLabel" Text='<%# Eval("ProductName") %>' /> </h5> Price: <asp:Label runat="server" ID="Label1" Text='<%# Eval("UnitPrice", "{0:C}") %>' /> <br /> <asp:Button runat="server" id="EditProduct" CommandName="Edit" Text="Edit" /> <asp:Button runat="server" id="DeleteProduct" CommandName="Delete" Text="Delete" /> <br /> <br /></ItemTemplate> |
然后為DataList的DeleteCommand事件創建一個event handler,見下面的代碼:
|
1
2
3
4
5
6
7
8
9
10
|
protected void DataList1_DeleteCommand(object source, DataListCommandEventArgs e){ // Read in the ProductID from the DataKeys collection int productID = Convert.ToInt32(DataList1.DataKeys[e.Item.ItemIndex]); // Delete the data ProductsBLL productsAPI = new ProductsBLL(); productsAPI.DeleteProduct(productID); // Rebind the data to the DataList DataList1.DataBind();} |
點擊Delete button 會引起postback,并激發DataList的DeleteCommand事件。在事件處理中,被點擊的product的ProductID的值通過DateKeys集合來獲取。然后,調用ProductsBLL類的DeleteProduct方法來刪除product。刪除product后,要將數據重新綁定到DataList(DataList1.DataBind()),否則DataList里還會看到剛才刪除的product。
總結
通過少量的代碼,DataList也可以擁有GridView的編輯刪除功能。在本章我們學習了如何創建一個兩列的顯示product的頁,并且可以編輯name和price,刪除product。增加編輯和刪除功能需要在ItemTemplate和EditItemTemplate里增加合適的控件,創建對應的事件處理,讀取用戶的輸入和主鍵值,然后調用BLL。
雖然我們為DataList增加了基本的編輯和刪除功能,它還是缺少一些高級特性。比如,沒有輸入字段驗證- 如果用戶輸入的price太“貴”,Decimal.Parse在轉換為Decimal時會拋出異常。同樣的,如果在更新數據時,BLL或DAL里有異常,用戶會看到系統錯誤。在刪除時沒有任何確認,很可能會誤刪數據。在后面的教程里我們會學習如何改善這些問題。
祝編程快樂!
作者簡介
本系列教程作者 Scott Mitchell,著有六本ASP/ASP.NET方面的書,是4GuysFromRolla.com的創始人,自1998年以來一直應用 微軟Web技術。大家可以點擊查看全部教程《[翻譯]Scott Mitchell 的ASP.NET 2.0數據教程》,希望對大家的學習ASP.NET有所幫助。


