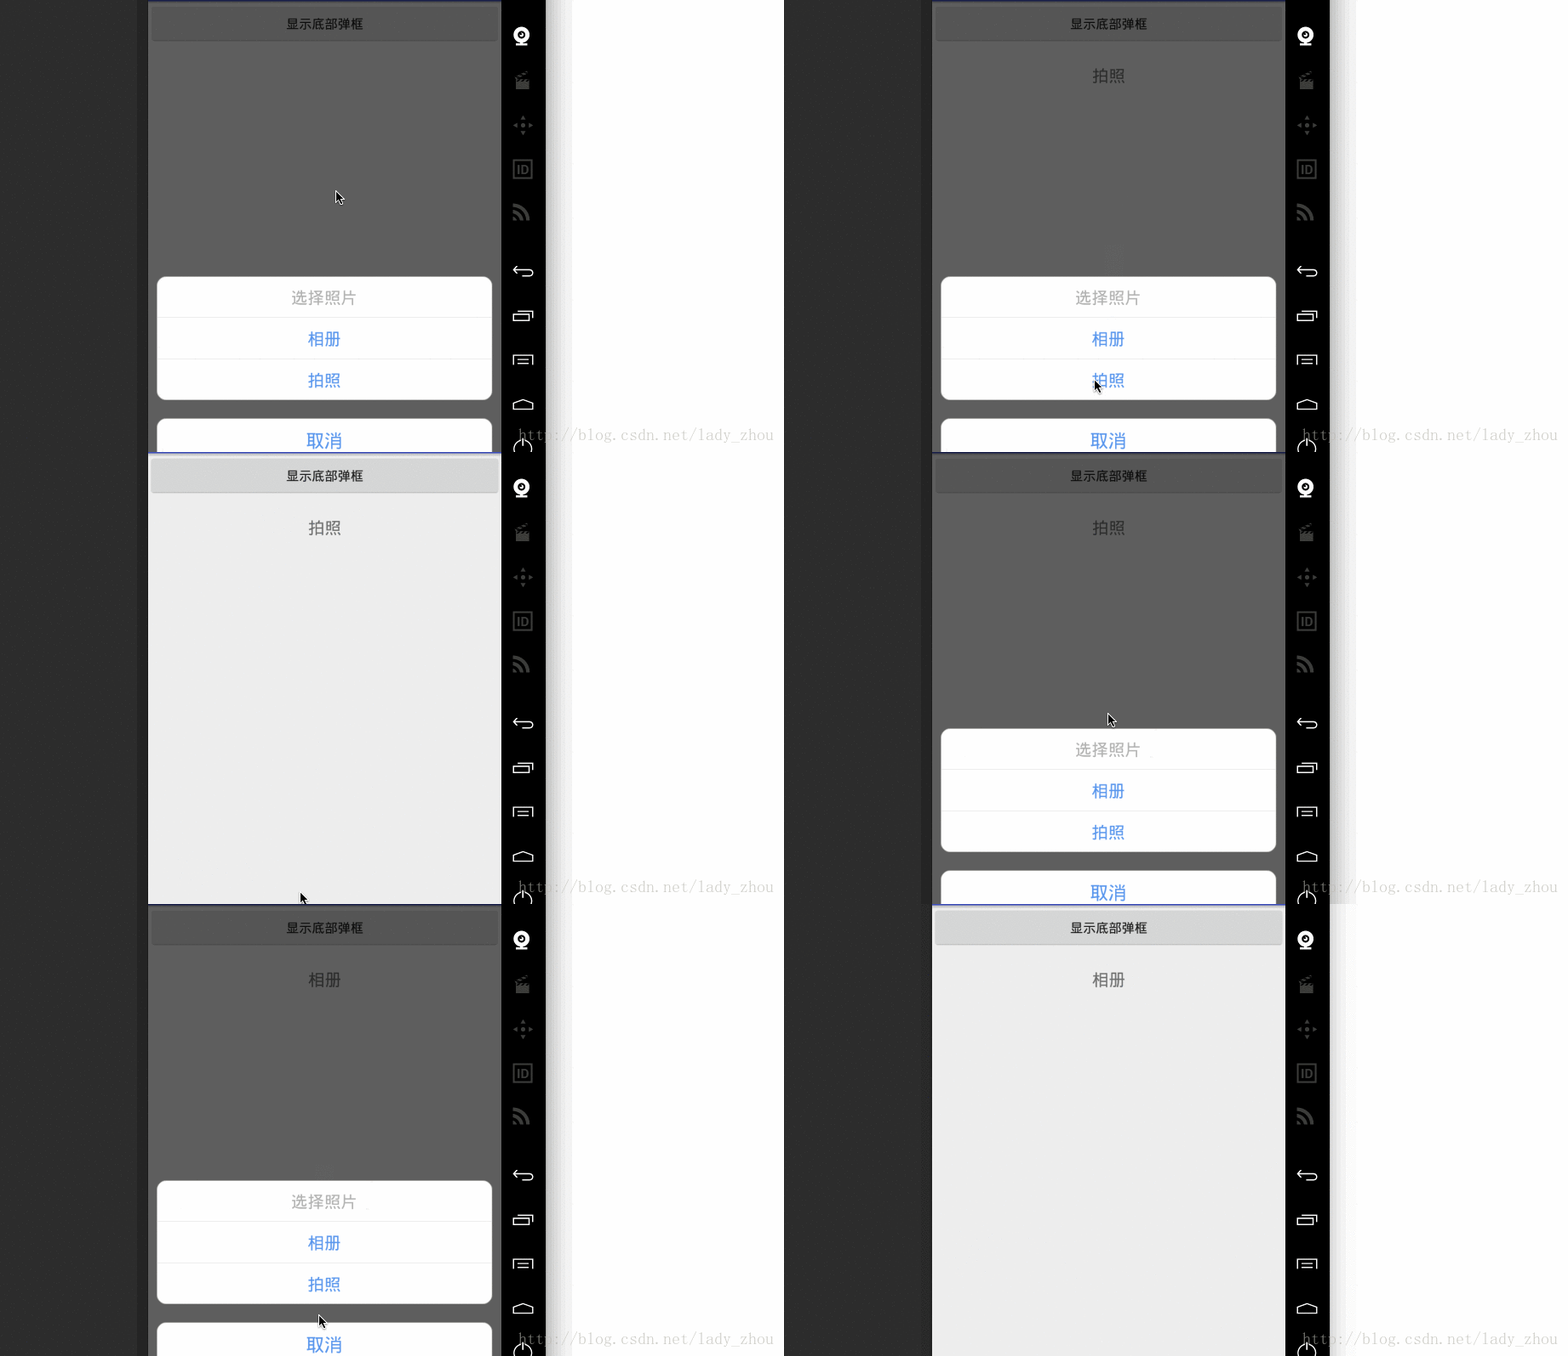
最近因為項目需要,用Android Dialog仿ios9中的UIAlertController控件,第一次對自定義控件進行封裝,請大家多多指教

如圖所示,當我封裝的Dialog被觸發時,從底部彈出,點擊取消鍵整個彈框會消失,當點擊不同的TextView會有相應的點擊事件發生,目前只寫了三個能被點擊的TextView(以后會改為可以動態添加個數)。
以下代碼是我封裝的BottomDialog:
|
1
2
3
4
5
6
7
8
9
10
11
12
13
14
15
16
17
18
19
20
21
22
23
24
25
26
27
28
29
30
31
32
33
34
35
36
37
38
39
40
41
42
43
44
45
46
47
48
49
50
51
52
53
54
55
56
57
58
59
60
61
62
63
64
65
66
67
68
69
70
71
72
73
74
75
76
77
78
79
80
81
82
83
84
85
86
87
88
89
90
91
92
93
94
95
96
97
98
99
100
101
102
103
104
105
106
107
108
109
110
111
112
113
114
115
116
117
118
119
120
121
122
123
124
125
126
127
128
129
130
131
132
133
134
135
136
137
138
139
140
141
142
143
144
145
146
147
148
149
150
151
152
153
154
155
156
157
158
159
160
161
162
163
164
165
166
167
168
169
170
171
172
173
174
175
176
177
178
179
180
181
182
183
184
185
186
187
188
189
190
191
192
193
194
195
196
197
198
199
200
201
202
203
|
public class BottomDialog extends Dialog { private TextView mTitleTv; private TextView mOneTv; private TextView mTwoTv; private TextView mCancelTv; private Dialog myDialog; private ClickListenerInterface clickListenerInterface; public interface ClickListenerInterface { void onTitleClick();//點擊標題TextView void onOneClick();//點擊第一個TextView void onTwoClick();//點擊第二個TextView } public BottomDialog(@NonNull Context context) { super(context); init(); } public BottomDialog(@NonNull Context context, @StyleRes int themeResId) { super(context, themeResId); init(); } protected BottomDialog(@NonNull Context context, boolean cancelable, @Nullable OnCancelListener cancelListener) { super(context, cancelable, cancelListener); init(); } private void init() { myDialog = new Dialog(getContext(), R.style.BottomDialogStyle); //填充對話框的布局 View view = LayoutInflater.from(getContext()).inflate(R.layout.dialog_bottom, null); //初始化控件 mTitleTv = (TextView) view.findViewById(R.id.tv_dialog_title); mOneTv = (TextView) view.findViewById(R.id.tv_dialog_one); mTwoTv = (TextView) view.findViewById(R.id.tv_dialog_two); mCancelTv = (TextView) view.findViewById(R.id.tv_dialog_cancel); mTitleTv.setOnClickListener(new DialogClickListener()); mOneTv.setOnClickListener(new DialogClickListener()); mTwoTv.setOnClickListener(new DialogClickListener()); mCancelTv.setOnClickListener(new DialogClickListener()); //將布局設置給Dialog myDialog.setContentView(view); //獲取當前Activity所在的窗體 Window dialogWindow = myDialog.getWindow(); //設置Dialog從窗體底部彈出 dialogWindow.setGravity(Gravity.BOTTOM); //獲得窗體的屬性 WindowManager.LayoutParams lp = dialogWindow.getAttributes(); lp.width = (int) (dialogWindow.getWindowManager().getDefaultDisplay().getWidth() * 0.95); lp.y = 20; //設置Dialog距離底部的距離 dialogWindow.setAttributes(lp); //將屬性設置給窗體 myDialog.show();//顯示對話框 } public void setClicklistener(ClickListenerInterface clickListenerInterface) { this.clickListenerInterface = clickListenerInterface; } private class DialogClickListener implements View.OnClickListener { @Override public void onClick(View v) { switch (v.getId()) { case R.id.tv_dialog_title: clickListenerInterface.onTitleClick(); break; case R.id.tv_dialog_one: clickListenerInterface.onOneClick(); break; case R.id.tv_dialog_two: clickListenerInterface.onTwoClick(); break; case R.id.tv_dialog_cancel: myDialog.dismiss(); break; } } } public void dismissDialog() { if (myDialog != null && myDialog.isShowing()) { myDialog.dismiss(); } } /** * 設置標題欄文本文字 * * @param stringId * @see #setTitleText(String) */ public void setTitleText(@StringRes int stringId) { setTitleText(getContext().getString(stringId)); } /** * 設置標題欄文本文字 * * @param text */ public void setTitleText(String text) { mTitleTv.setText(text); mTitleTv.setVisibility(View.VISIBLE); } /** * 設置第一個TextView文字 * * @param stringId */ public void setOneText(@StringRes int stringId) { setOneText(getContext().getString(stringId)); } /** * 設置第一個TextView文字 * * @param text */ public void setOneText(String text) { mOneTv.setText(text); mOneTv.setVisibility(View.VISIBLE); } /** * 設置第二個TextView文字 * * @param stringId */ public void setTwoText(@StringRes int stringId) { setTwoText(getContext().getString(stringId)); } /** * 設置第二個TextView文字 * * @param text */ public void setTwoText(String text) { mTwoTv.setText(text); mTwoTv.setVisibility(View.VISIBLE); } /** * 獲取標題欄文本 * * @return */ public final TextView getTitleTv() { return mTitleTv; } /** * 獲取第一個文本 * * @return */ public final TextView getOneTv() { return mOneTv; } /** * 獲取第二個文本 * * @return */ public final TextView getTwoTv() { return mTwoTv; } /** * 設置字體顏色 * * @param titleColor 標題的顏色,默認是灰色 * @param otherColor 其他的顏色,默認是藍色 * @param i 有2種模式,1(標題和其他顏色不一樣)2(標題和其他顏色一樣,取消鍵不一樣) */ public void setColor(int titleColor, int otherColor, int i) { if (i == 1) { mTitleTv.setTextColor(ContextCompat.getColor(getContext(), titleColor)); mOneTv.setTextColor(ContextCompat.getColor(getContext(), otherColor)); mTwoTv.setTextColor(ContextCompat.getColor(getContext(), otherColor)); } if (i == 2) { mTitleTv.setTextColor(ContextCompat.getColor(getContext(), titleColor)); mOneTv.setTextColor(ContextCompat.getColor(getContext(), titleColor)); mTwoTv.setTextColor(ContextCompat.getColor(getContext(), titleColor)); mCancelTv.setTextColor(ContextCompat.getColor(getContext(), otherColor)); } } @Override public void onProvideKeyboardShortcuts(List<KeyboardShortcutGroup> data, @Nullable Menu menu, int deviceId) { }} |
在Activity中的應用:
|
1
2
3
4
5
6
7
8
9
10
11
12
13
14
15
16
17
18
19
20
21
22
23
24
25
26
27
28
29
30
31
32
33
34
35
36
37
38
39
40
41
42
43
44
45
46
47
|
public class MainActivity extends AppCompatActivity implements View.OnClickListener { private BottomDialog bottomDialog; private Button mButton; private TextView mTextView; @Override protected void onCreate(Bundle savedInstanceState) { super.onCreate(savedInstanceState); setContentView(R.layout.activity_main); mButton = (Button) findViewById(R.id.button); mTextView = (TextView) findViewById(R.id.textView); mButton.setOnClickListener(this); } @Override public void onClick(View v) { switch (v.getId()) { case R.id.button: showBottomDialog(); break; } } /** * 展示 */ private void showBottomDialog() { bottomDialog = new BottomDialog(this); bottomDialog.setClicklistener(new BottomDialog.ClickListenerInterface() { @Override public void onTitleClick() { } @Override public void onOneClick() { mTextView.setText(bottomDialog.getOneTv().getText().toString()); } @Override public void onTwoClick() { mTextView.setText(bottomDialog.getTwoTv().getText().toString()); } }); }} |
被封裝的Dialog主要提供的方法有:修改相應的TextView文字和顏色,提供點擊相應的TextView的點擊事件。
這里的點擊事件主要用的是回調的方法,在Dialog中定義一個接口,在點擊事件調用這個接口,當在Activity中觸發這個回調接口時,點擊事件產生。
主要代碼是:
|
1
2
3
4
5
6
7
8
9
10
11
12
13
14
15
16
17
18
19
20
21
22
23
24
25
26
27
28
29
30
31
32
33
|
private ClickListenerInterface clickListenerInterface;public interface ClickListenerInterface { void onTitleClick();//點擊標題TextView void onOneClick();//點擊第一個TextView void onTwoClick();//點擊第二個TextView} public void setClicklistener(ClickListenerInterface clickListenerInterface) { this.clickListenerInterface = clickListenerInterface;}private class DialogClickListener implements View.OnClickListener { @Override public void onClick(View v) { switch (v.getId()) { case R.id.tv_dialog_title: clickListenerInterface.onTitleClick(); break; case R.id.tv_dialog_one: clickListenerInterface.onOneClick(); break; case R.id.tv_dialog_two: clickListenerInterface.onTwoClick(); break; case R.id.tv_dialog_cancel: myDialog.dismiss(); break; } }} |
最后說一下更改文字顏色的方法:
|
1
|
public void setColor(int titleColor, int otherColor, int i) {} |
第一個傳的顏色是修改最上面的TextView,第二個傳的顏色是修改其他的文字顏色,第三個參數是表明你選用哪種模式,分別傳1或2,有2種模式
- 標題和其他顏色不一樣
- 標題和其他顏色一樣,取消鍵不一樣
下面是我的Github地址
以上就是本文的全部內容,希望對大家的學習有所幫助,也希望大家多多支持服務器之家。
原文鏈接:https://blog.csdn.net/lady_zhou/article/details/75213800


