最近工作中需要用到webservice,而且結合spring boot進行開發,參照了一些網上的資料,配置過程中出現的了一些問題,于是寫了這篇博客,記錄一下我這次spring boot+cxf開發的webservice的配置過程,僅供參考。
一、本次開發除了用到spring boot基礎jar包外,還用到了cxf相關jar包:
|
1
2
3
4
5
6
7
8
9
10
11
|
<!-- cxf支持 --> <dependency> <groupid>org.apache.cxf</groupid> <artifactid>cxf-rt-frontend-jaxws</artifactid> <version>3.1.6</version> </dependency> <dependency> <groupid>org.apache.cxf</groupid> <artifactid>cxf-rt-transports-http</artifactid> <version>3.1.6</version> </dependency> |
二、首先我們創建一個實體類,內容是關于用戶信息的查詢和記錄:
|
1
2
3
4
5
6
7
8
9
10
11
12
13
14
15
16
17
18
19
20
21
22
23
24
25
26
27
28
29
30
31
32
33
34
35
36
37
38
|
import java.io.serializable;import java.util.date;public class user implements serializable { private static final long serialversionuid = -5939599230753662529l; private string userid; private string username; private string age; private date updatetime; //getter setter ...... public void setuserid(string userid) { this.userid=userid; } public void setusername(string username) { this.username=username; } public void setage(string age) { this.age=age; } public void setupdatetime(date updatetime) { this.updatetime=updatetime; } public string getuserid() { return userid; } public string getusername() { return username; } public string getage() { return age; } public date getupdatetime() { return updatetime; }} |
三、接下來我們創建接口類:
|
1
2
3
4
5
6
7
8
9
10
11
12
13
14
15
|
import javax.jws.webmethod;import javax.jws.webparam;import javax.jws.webservice;import cn.paybay.demo.entity.user;@webservicepublic interface userservice { @webmethod string getname(@webparam(name = "userid") string userid); @webmethod user getuser(string userid);} |
四、有了接口類,那么接下來我們對接口進行實現,也就是接口實現類(也就是業務類)代碼:
|
1
2
3
4
5
6
7
8
9
10
11
12
13
14
15
16
17
18
19
20
21
22
23
24
25
26
27
28
29
30
31
32
33
34
35
36
37
38
39
40
41
42
43
44
45
46
47
48
49
50
51
|
package cn.paybay.demo.service.impl;import java.util.date;import java.util.hashmap;import java.util.map;import javax.jws.webservice;import cn.paybay.demo.entity.user;import cn.paybay.demo.service.userservice;@webservice(targetnamespace="http://service.demo.paybay.cn/",endpointinterface = "cn.paybay.demo.service.userservice")public class userserviceimpl implements userservice{ private map<string, user> usermap = new hashmap<string, user>(); public userserviceimpl() { system.out.println("向實體類插入數據"); user user = new user(); user.setuserid("411001"); user.setusername("zhansan"); user.setage("20"); user.setupdatetime(new date()); usermap.put(user.getuserid(), user); user = new user(); user.setuserid("411002"); user.setusername("lisi"); user.setage("30"); user.setupdatetime(new date()); usermap.put(user.getuserid(), user); user = new user(); user.setuserid("411003"); user.setusername("wangwu"); user.setage("40"); user.setupdatetime(new date()); usermap.put(user.getuserid(), user); } @override public string getname(string userid) { return "liyd-" + userid; } @override public user getuser(string userid) { system.out.println("usermap是:"+usermap); return usermap.get(userid); }} |
注釋(ps):在發布服務之前,我們要在這里對業務實現類進行一下說明,請大家看下圖箭頭指向的方框部分
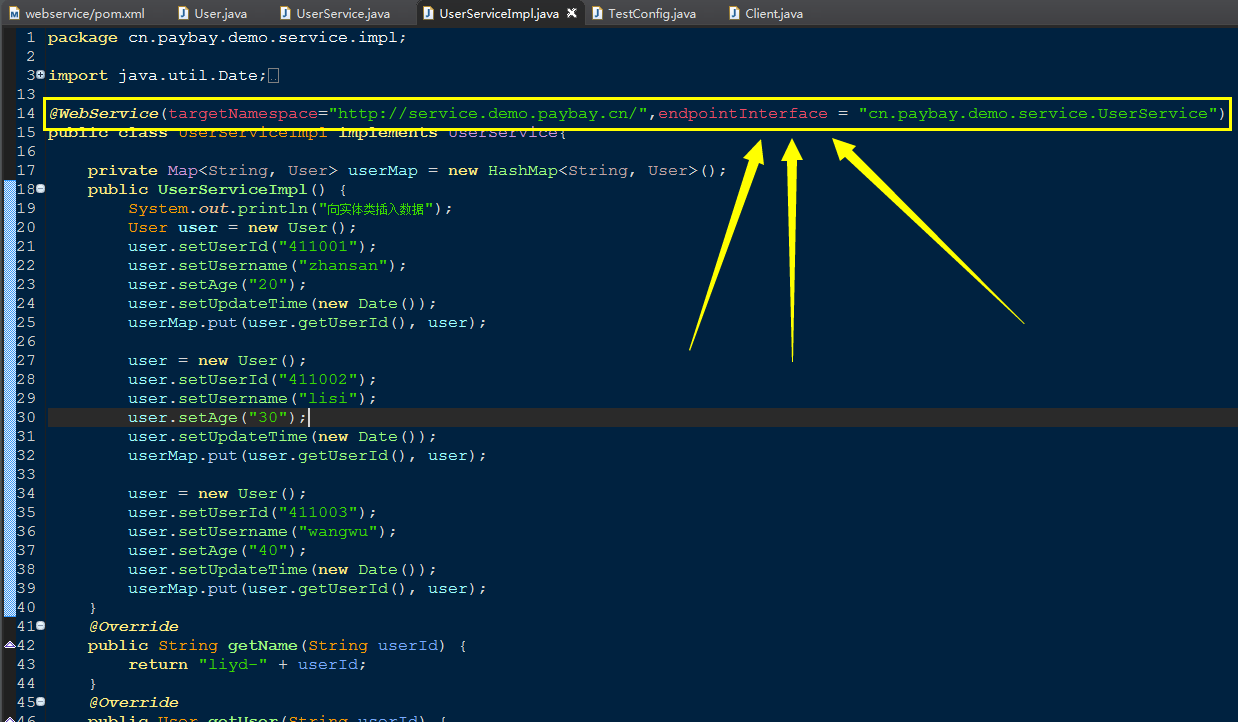
下面我來解釋一下加上圖方框箭頭所指代碼的目的:
http://impl.service.demo.paybay.cn/:這是我的業務類所在路徑;
http://service.demo.paybay.cn/:這是我的接口類所在路徑;
在不加上圖方框箭頭所指代碼的情況下,你最后發服務的結果是這樣的(如下圖):
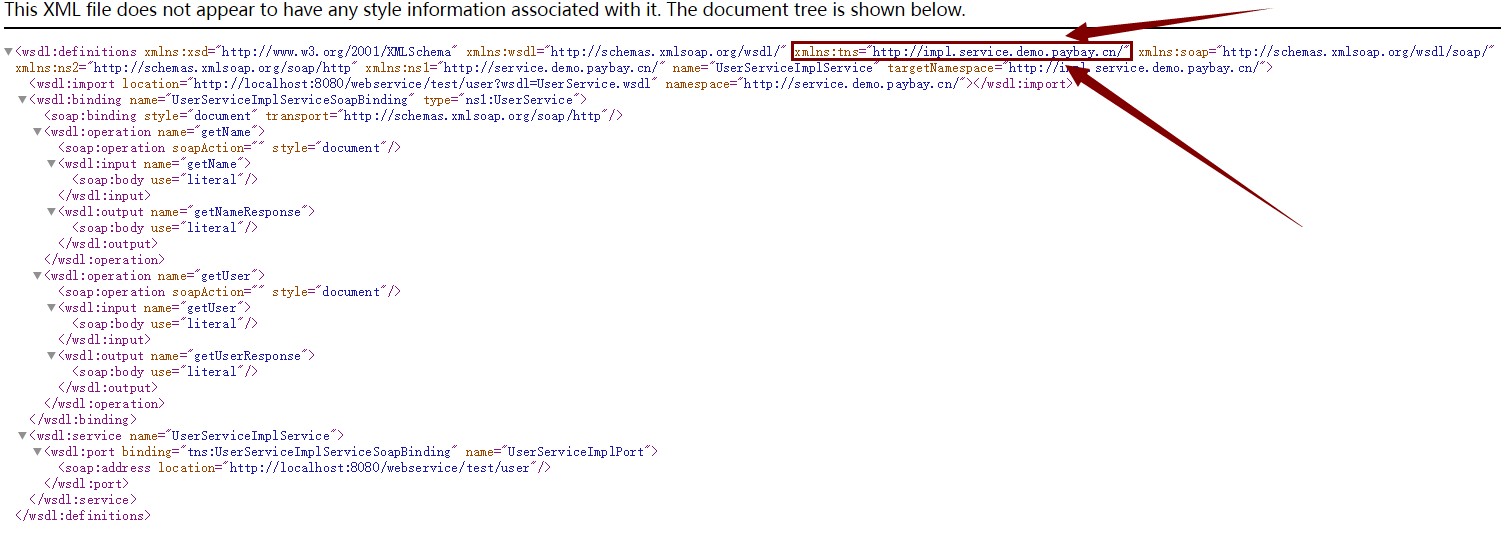
并且會在你進行客戶端調用的時候回報錯:no operation was found with the name {http://impl.service.demo.paybay.cn/}getuser.那么原因就是:在cxf發布服務的時候,發布的是業務類(userserviceimpl.java),那么默認的命名空間就會是業務類所在包(路徑),而對外界暴露的則是接口類(userservice.java),那么對于客戶端調用的時侯,需要按照接口類所在路徑進行命名空間的定義。
所以在發布之前我們要在業務類(userserviceimpl.java)上增加注解,指定命名空間,然后再進行發布,
那么我們最終在加上(圖一)方框箭頭所指代碼情況下,發布服務的結果為下圖(請看圖三):

五、(發布服務)接口類,業務類代碼都已經準備好,那么我接下來我就要對webservice服務進行發布:
代碼如下:
|
1
2
3
4
5
6
7
8
9
10
11
12
13
14
15
16
17
18
19
20
21
22
23
24
25
26
27
28
29
30
31
32
33
34
35
36
37
|
import javax.xml.ws.endpoint;import org.apache.cxf.bus;import org.apache.cxf.bus.spring.springbus;import org.apache.cxf.jaxws.endpointimpl;import org.apache.cxf.transport.servlet.cxfservlet;import org.springframework.boot.web.servlet.servletregistrationbean;import org.springframework.context.annotation.bean;import org.springframework.context.annotation.configuration;import cn.paybay.demo.service.userservice;import cn.paybay.demo.service.impl.userserviceimpl;@configurationpublic class testconfig { @bean public servletregistrationbean dispatcherservlet() { return new servletregistrationbean(new cxfservlet(), "/test/*"); } @bean(name = bus.default_bus_id) public springbus springbus() { return new springbus(); } @bean public userservice userservice() { return new userserviceimpl(); } @bean public endpoint endpoint() { endpointimpl endpoint = new endpointimpl(springbus(), userservice()); endpoint.publish("/user"); return endpoint; }} |
那么到這里呢,我們的所有的步驟基本完成了,啟動spring boot 然后再瀏覽器中輸入url:http://localhost:8080/webservice/test/user?wsdl
可以看到有相關的wsdl描述信息輸出了,說明服務已經發布了。
那么這里我又要增加注釋了,請大家注意,我在最初查詢資料,配置demo的時候,啟動以后,發布時候總是報404,網上有很多關于什么端口沖突等說法,我試過后,根本不是那一回事,然后我無意中嘗試了一下,在url地址處加入工程名,結果,問題解決了。
因此請大家注意:在測試發布服務的時候,你在瀏覽器中輸入的url地址應該是:http://localhost:8080/你的工程名/test/user?wsdl;
然后就是發布結果如下圖(見圖四):
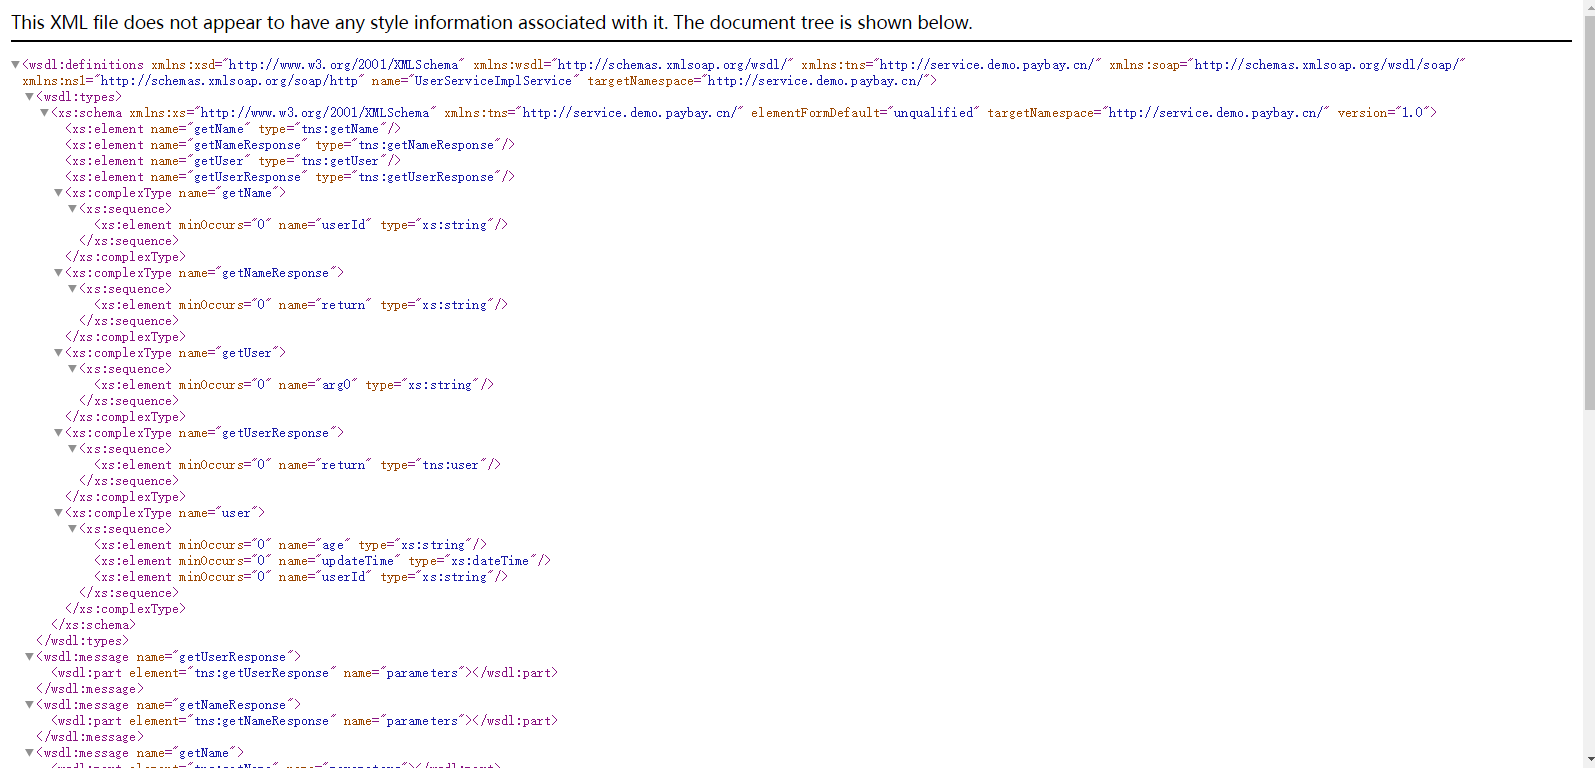
到此為止,我們的服務發布成功了。
六、調用服務
|
1
2
3
4
5
6
7
8
9
10
11
12
13
14
15
16
|
import org.apache.cxf.jaxws.endpoint.dynamic.jaxwsdynamicclientfactory;public class client { public static void main(string args[]) throws exception{ jaxwsdynamicclientfactory dcf =jaxwsdynamicclientfactory.newinstance(); org.apache.cxf.endpoint.client client =dcf.createclient("http://localhost:8080/webservice/test/user?wsdl"); //getuser 為接口中定義的方法名稱 張三為傳遞的參數 返回一個object數組 object[] objects=client.invoke("getuser","411001"); //輸出調用結果 system.out.println("*****"+objects[0].tostring()); } } |
七、最后附上我的工程結構圖(見圖五):
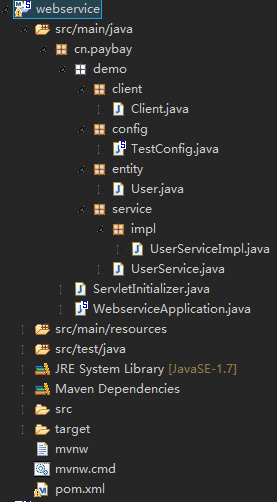
以上就是本文的全部內容,希望對大家的學習有所幫助,也希望大家多多支持服務器之家。
原文鏈接:http://www.cnblogs.com/fuxin41/p/6289162.html


