spring中有很多概念和名詞,其中有一些名字不同,但是從功能上來看總感覺是那么的相似,比如過濾器、攔截器、aop等。
過濾器filter、spring mvc攔截器Interceptor 、面向切面編程aop,實(shí)際上都具有一定的攔截作用,都是攔截住某一個面,然后進(jìn)行一定的處理。
在這里主要想著手的是aop,至于他們的比較,我想等三個都一一了解完了再說,因此這里便不做過多的比較。
在我目前的項目實(shí)踐中,只在一個地方手動顯示的使用了aop,那便是日志管理中對部分重要操作的記錄。
據(jù)我目前所知,aop攔截一般都是用在具體的方法上,或者說是具體的某一類方法,我所用過的實(shí)現(xiàn)方式有兩種,一種是直接代碼聲明,一種是在xml文件中配置。
由于我目前實(shí)際開發(fā)的項目都是使用spring+spring mvc的架構(gòu),然后使用maven管理,然后junit測試。因此我自己幾乎所有的個人項目也都是采用這些架構(gòu)和項目管理工具,在這個理解aop的小項目中,自然也是這樣,依賴包如下:
|
1
2
3
4
5
6
7
8
9
10
11
12
13
14
15
16
17
18
19
20
21
22
23
24
25
26
27
28
29
30
31
32
33
|
<project xmlns="http://maven.apache.org/POM/4.0.0" xmlns:xsi="http://www.w3.org/2001/XMLSchema-instance" xsi:schemaLocation="http://maven.apache.org/POM/4.0.0 http://maven.apache.org/xsd/maven-4.0.0.xsd"> <modelVersion>4.0.0</modelVersion> <groupId>springTest</groupId> <artifactId>aopTest</artifactId> <version>0.0.1-SNAPSHOT</version> <dependencies> <dependency> <groupId>junit</groupId> <artifactId>junit</artifactId> <version>4.12</version> </dependency> <dependency> <groupId>org.springframework</groupId> <artifactId>spring-context</artifactId> <version>4.0.3.RELEASE</version> </dependency> <dependency> <groupId>org.springframework</groupId> <artifactId>spring-aop</artifactId> <version>4.0.3.RELEASE</version> </dependency> <dependency> <groupId>org.springframework</groupId> <artifactId>spring-test</artifactId> <version>4.0.3.RELEASE</version> </dependency> <dependency> <groupId>org.aspectj</groupId> <artifactId>aspectjweaver</artifactId> <version>1.8.4</version> </dependency> </dependencies></project> |
第一種方式,Java代碼聲明:
這里實(shí)例中,我要聲明一個aop來攔截dao層中的get開頭的所有方法,首先建一個dao以及簡單的額imp實(shí)現(xiàn):
dao接口如下:
|
1
2
3
4
5
6
7
8
|
package com.ck.aopTest.dao;import com.ck.aopTest.model.UserModel;public interface MyAopDao { public void getUser(); public void getName(UserModel user); public void addUser();} |
簡單的實(shí)現(xiàn):
|
1
2
3
4
5
6
7
8
9
10
11
12
13
14
15
16
17
18
19
20
21
|
package com.ck.aopTest.dao.impl;import org.springframework.stereotype.Repository;import com.ck.aopTest.dao.MyAopDao;import com.ck.aopTest.model.UserModel;@Repositorypublic class MyAopDaoImpl implements MyAopDao { @Override public void getUser() { System.out.println("這是我的aop測試dao方法一"); } @Override public void getName(UserModel userModel) { System.out.println("這是我的aop測試dao方法二"); } @Override public void addUser() { System.out.println("這是我的aop測試dao方法三"); }} |
然后聲明一個aop:
|
1
2
3
4
5
6
7
8
9
10
11
12
13
14
15
16
17
18
19
20
21
22
23
24
25
26
27
28
29
30
31
32
33
34
35
36
37
38
39
|
package com.ck.aopTest.aop;import java.util.Date;import org.aspectj.lang.ProceedingJoinPoint;import org.aspectj.lang.annotation.After;import org.aspectj.lang.annotation.Around;import org.aspectj.lang.annotation.Aspect;import org.aspectj.lang.annotation.Before;import org.aspectj.lang.annotation.Pointcut;import org.springframework.stereotype.Component;import com.ck.aopTest.model.UserModel;@Aspect@Componentpublic class MyAop { @Pointcut("execution(public * com.ck.aopTest.dao.impl.*.get*(..))") private void aopTest() { } @Before("aopTest()") public void before() { System.out.println("調(diào)用dao方法前攔截" + new Date().getTime()); } @After("aopTest()" + "&&args(user)") public void after(UserModel user) { System.out.println(user.getName()); System.out.println("調(diào)用dao方法之后攔截" + new Date().getTime()); } @Around("aopTest()") public void around(ProceedingJoinPoint pdj) { System.out.println("調(diào)用dao之前的環(huán)繞攔截" + new Date().getTime()); try { pdj.proceed(); } catch (Throwable e) { e.printStackTrace(); } System.out.println("調(diào)用dao之后的環(huán)繞攔截" + new Date().getTime()); }} |
上述代碼便是用java聲明aop的核心代碼,其中注解@Aspect的作用的就是告訴spring這是一個aop類,然后@Component就不用多說了,告訴spring這是一個需要掃描的類。
再往下,@Pointcut(“execution(public * com.ck.aopTest.dao.impl..get(..))”)正式聲明需要攔截的切面,@Pointcut以及后邊的額execution是固定的寫法,execution后括號內(nèi)的內(nèi)容便是具體的切面,這里的意思是攔截所有public的任何返回值或者void的、命名空間是com.ck.aopTest.dao.impl下邊的所有的類中的所有g(shù)et開頭的擁有任意多個參數(shù)的方法。
簡單點(diǎn)說也就是當(dāng)任何調(diào)用了com.ck.aopTest.dao.impl這個包中任何類中的get開頭的方法,便會激活這個aop。
而緊接著上邊這一段,我們看到了一個private void aopTest() 空的方法,實(shí)際上這個方法的作用是為這個aop切面聲明一個名字,便于使用,也便于在多個aop切面時正常區(qū)分。
再后邊的@Before、@After、@Around便是三個可選攔截方式,見名之意,分別是在上邊聲明的切面指明的方法調(diào)用之前執(zhí)行、調(diào)用之后執(zhí)行、以及環(huán)繞執(zhí)行,調(diào)用之前和調(diào)用之后比較好理解,環(huán)繞的意思是在調(diào)用之前和之后都執(zhí)行一定的邏輯。
從代碼中可以看出,pdj.proceed();之前和之后各打印了兩行數(shù)據(jù),pdj.proceed();就代表了繼續(xù)執(zhí)行,如果是了解filter的應(yīng)該很容易想到這個方法實(shí)際上和chain.doFilter很像,可以理解成放行。
在這三個注解之后需要指定要使用的切面,即@Pointcut聲明的切面,指定名稱就行。
從代碼中可以看到有一個地方后邊加了“&&args(UserModel user)”,意思是指定形參,也就是說指定的切面中有效方法的參數(shù),例如上邊dao中的getName方法有一個UserModel類型的參數(shù),這里便可以使用。
主要代碼寫好了,接下來還有個必不可少的步驟,既然是spring項目,是spring的aop,那么自然需要配置spring文件,指明需要spring管理的包:
|
1
2
3
4
5
6
7
8
9
10
|
<?xml version="1.0" encoding="UTF-8"?> <beans xmlns="http://www.springframework.org/schema/beans" xmlns:xsi="http://www.w3.org/2001/XMLSchema-instance" xmlns:context="http://www.springframework.org/schema/context" " xsi:schemaLocation="http://www.springframework.org/schema/beans http://www.springframework.org/schema/beans/spring-beans-3.0.xsd http://www.springframework.org/schema/context http://www.springframework.org/schema/context/spring-context-3.0.xsd"> <context:component-scan base-package="com.ck.aopTest.*" /></beans> |
為了驗證這里的aop是否真的有效,我寫了一個junit測試:
|
1
2
3
4
5
6
7
8
9
10
11
12
13
14
15
16
17
18
19
20
21
|
package com.ck.aopTest.test;import org.junit.Test;import org.junit.runner.RunWith;import org.springframework.beans.factory.annotation.Autowired;import org.springframework.test.context.ContextConfiguration;import org.springframework.test.context.junit4.SpringJUnit4ClassRunner;import com.ck.aopTest.dao.MyAopDao;import com.ck.aopTest.model.UserModel;@RunWith(SpringJUnit4ClassRunner.class)@ContextConfiguration(locations = "classpath:spring.xml")public class AopTest { @Autowired private MyAopDao myAopDao; @Test public void aopTest2() { UserModel user = new UserModel(); myAopDao.getName(user); }} |
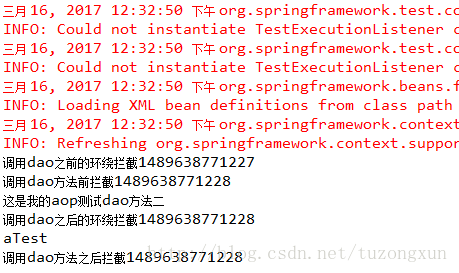
按理說,這里運(yùn)行測試方法后應(yīng)該打印出很多條輸出,但是遺憾的是結(jié)果只是打印出了dao中的一條輸出,原因是spring配置中并沒有啟用aop,正確的配置應(yīng)該是下邊這樣:
|
1
2
3
4
5
6
7
8
9
10
11
12
13
14
15
16
|
<?xml version="1.0" encoding="UTF-8"?> <beans xmlns="http://www.springframework.org/schema/beans" xmlns:xsi="http://www.w3.org/2001/XMLSchema-instance" xmlns:context="http://www.springframework.org/schema/context" xmlns:aop="http://www.springframework.org/schema/aop" xsi:schemaLocation="http://www.springframework.org/schema/beans http://www.springframework.org/schema/beans/spring-beans-3.0.xsd http://www.springframework.org/schema/context http://www.springframework.org/schema/context/spring-context-3.0.xsd http://www.springframework.org/schema/aop http://www.springframework.org/schema/aop/spring-aop-4.0.xsd"> <aop:aspectj-autoproxy /> <context:component-scan base-package="com.ck.aopTest.*" /> </beans> |
我們需要再文件頭加入
|
1
|
xmlns:aop=”http://www.springframework.org/schema/aop” |
以及http://www.springframework.org/schema/aop
http://www.springframework.org/schema/aop/spring-aop-4.0.xsd
除此之外,還要啟用aop:
|
1
|
<aop:aspectj-autoproxy /> |
再次運(yùn)行測試方法會看到控制臺如下:

由此證明這個aop是有效的。
第二種方式,配置文件配置:
同樣的,這里還是用之前的dao以及對應(yīng)的impl,因此這段代碼便不再重復(fù),不一樣的是具體的aop類如下:
|
1
2
3
4
5
6
|
package com.ck.aopTest.aop;public class MyAop2 { public void before2() { System.out.println("這是我的使用注解的aop,調(diào)用dao之前攔截"); }} |
可以看到這個類實(shí)際上也是極致簡單,普通類,普通方法,沒有任何特別,然后我們要做的是在spring中配置:
|
1
2
3
4
5
6
7
8
9
10
11
12
13
14
15
16
17
18
19
20
21
22
23
|
<?xml version="1.0" encoding="UTF-8"?> <beans xmlns="http://www.springframework.org/schema/beans" xmlns:xsi="http://www.w3.org/2001/XMLSchema-instance" xmlns:context="http://www.springframework.org/schema/context" xmlns:aop="http://www.springframework.org/schema/aop" xsi:schemaLocation="http://www.springframework.org/schema/beans http://www.springframework.org/schema/beans/spring-beans-3.0.xsd http://www.springframework.org/schema/context http://www.springframework.org/schema/context/spring-context-3.0.xsd http://www.springframework.org/schema/aop http://www.springframework.org/schema/aop/spring-aop-4.0.xsd"> <aop:aspectj-autoproxy /> <bean id="myAop2" class="com.ck.aopTest.aop.MyAop2"></bean> <aop:config> <aop:pointcut expression="execution(public * com.ck.aopTest.dao.impl.*.add*(..))" id="aopTest1"/> <aop:aspect id="myAopTest2" ref="myAop2"> <aop:before method="before2" pointcut-ref="aopTest1"/> </aop:aspect> </aop:config> <context:component-scan base-package="com.ck.aopTest.*" /></beans> |
至于這里配置內(nèi)容的具體解釋,我想通過我對第一種方式的解釋后,也沒有太大必要再說,稍微一對比就會一清二楚。
同樣的,這里只演示了before,至于after和round的配置應(yīng)該也很容易就可以根據(jù)before推理出來。
以上就是本文的全部內(nèi)容,希望對大家的學(xué)習(xí)有所幫助,也希望大家多多支持服務(wù)器之家。
原文鏈接:http://blog.csdn.net/tuzongxun/article/details/62420843


