本文實例講解了java發郵件的詳細過程,供大家參考,具體內容如下
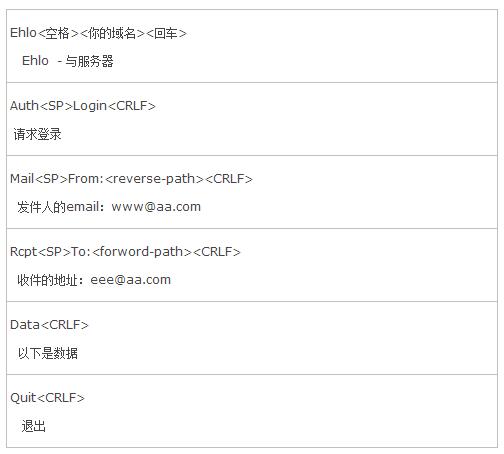
1、郵件協議
發郵件的:SMTP (Simple Mail Transport Protocal)
收郵件的協議:pop3 (Post Office Protocal 3)
IMAP 新協議 發郵件也可以收郵件。
(一步步的與服務器交互)
SMTP :

2、收發郵件的過程:
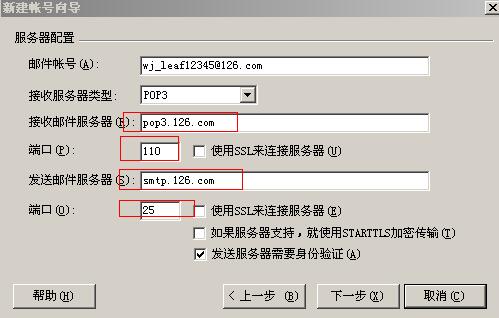
一般情況下,smtp和pop3是兩個服務器(主機)。
Smtp郵件的端口為25。
POP3 端口 為110。
發郵件示例
1)、安裝foxmail:

2)、發郵件時,要對用戶名和密碼進行base64編碼
|
1
2
3
4
5
6
7
8
9
10
11
12
13
14
|
//對用戶名和密碼進行base64編碼@Testpublic void base64(){String name = "wj_leaf12345";String pwd = "1qaz2wsx";BASE64Encoder en = new BASE64Encoder();name = en.encode(name.getBytes());pwd = en.encode(pwd.getBytes());System.err.println(name);System.err.println(pwd);} |
3)、通過java代碼發郵件
用java發郵件,必須要導入新的包
mail.jar – 發郵件的核心包
activation.jar – 對用戶和密碼加密.
在mail.jar中有三個核心類:
Javax.mail.Session – 是指與郵件服務器會話。整個項目中只要一個就可以了.
Javax.mail.Message(接口) —準備發送數據信息。
MimeMessage - 可以設置類型的數據信息。
Transport – 它擁有一個方法可以發送Message。
第一步:導入兩個jar包
第二步:發簡單的郵件
|
1
2
3
4
5
6
7
8
9
10
11
12
13
14
15
16
17
18
19
20
21
22
23
24
25
26
27
28
29
30
31
32
33
34
35
36
37
38
39
40
41
42
43
44
45
46
|
public void sendMail() throws Exception{ //第一步:聲明properties對象放信息 Properties prop = new Properties(); //設置連接哪一臺服務器 prop.setProperty("mail.host","smtp.126.com"); //設置是否驗證 prop.setProperty("mail.smtp.auth", "true"); //第二步:聲明用戶名和密碼 Authenticator auth = new Authenticator() { //此訪求返回用戶和密碼的對象 public PasswordAuthentication getPasswordAuthentication() { PasswordAuthentication pa = new PasswordAuthentication("aaa", "sss"); return pa; } }; ////第二步:獲取Session對象 Session session = Session.getDefaultInstance(prop,auth); //設置session的調試模式 session.setDebug(true); //第三步:聲明信息 MimeMessage mm1 = new MimeMessage(session); //第四步:設置發件人email Address from = new InternetAddress("wj@126.com"); mm1.setFrom(from); //第五步:設置收件人 mm1.setRecipient(RecipientType.TO,new InternetAddress("wj@163.com")); mm1.setRecipient(RecipientType.CC, new InternetAddress("554@qq.com")); mm1.setRecipient(RecipientType.BCC, new InternetAddress("wj@ss.cn")); //第六步:設置主題 mm1.setSubject("這是用Java發的郵件3"); mm1.setContent("你好,這是用java發的郵件,3333再試一下", "text/plain;charset=UTF-8"); //第七步: Transport.send(mm1); } |
第三步:v發帶有超連接的郵件
|
1
2
3
4
5
6
|
mm1.setSubject("這是用Java發的郵件sfasdf3"); mm1.setContent("你好,這是用java發的郵件,<a href='http://www.baidu.com'>百度</a>", "text/html;charset=UTF-8" ); //第七步: Transport.send(mm1); |
第四步:符件的郵件
|
1
2
3
4
5
6
7
8
9
10
11
12
13
14
15
16
17
18
19
20
21
22
23
24
25
26
27
28
29
30
31
32
33
34
35
36
37
38
39
40
41
42
43
44
45
46
47
48
49
50
51
52
53
|
public void sendFile() throws Exception{ Properties p = new Properties(); p.setProperty("mail.host","smtp.163.com"); p.setProperty("mail.smtp.auth","true"); Session s = Session.getDefaultInstance(p,new Authenticator() { @Override public PasswordAuthentication getPasswordAuthentication() { return new PasswordAuthentication("ww", "123"); } }); s.setDebug(true); //聲明MimeMessage MimeMessage msg = new MimeMessage(s); msg.setFrom(new InternetAddress("ww@163.com")); msg.setRecipient(RecipientType.TO, new InternetAddress("ww@126.com")); //第一步:聲明多處理的Part MimeMultipart mm = new MimeMultipart(); //第二步:聲明 MimeBodyPart body1 = new MimeBodyPart(); //第三步:設置符件 DataSource ds = new FileDataSource(new File("./img/a.jpg")); DataHandler dh = new DataHandler(ds); body1.setDataHandler(dh); //必須要設置名稱 body1.setFileName(MimeUtility.encodeText("美女.jpg")); MimeBodyPart body2 = new MimeBodyPart(); //第三步:設置符件 DataSource ds2 = new FileDataSource(new File("./img/b.jpg")); DataHandler dh2 = new DataHandler(ds2); body2.setDataHandler(dh2); //必須要設置名稱 body2.setFileName(MimeUtility.encodeText("美女2.jpg")); MimeBodyPart body3 = new MimeBodyPart(); //第三步:設置符件 DataSource ds3 = new FileDataSource(new File("./img/m.mp3")); DataHandler dh3 = new DataHandler(ds3); body3.setDataHandler(dh3); //必須要設置名稱 body3.setFileName(MimeUtility.encodeText("世紀末.mp3")); //將body1添加到mm mm.addBodyPart(body1); mm.addBodyPart(body2); mm.addBodyPart(body3); msg.setContent(mm); //發送 Transport.send(msg); } |
以上就是本文的全部內容,希望對大家的學習有所幫助。


