springboot 接口版本區分
在進行REST接口的開發中,如果項目不斷的進行迭代開發,需求不斷的變化,會出現不同的版本,一個接口版本1和版本2的業務邏輯可能完全不同,但是又需要兼容之前的版本,我們可能不能在之前的接口進行修改,只能重新另外一個版本的接口,那該如何實現了?
目前有幾種方法,常見的有:一種是在url中加入版本號,第二種是在請求頭中加入版本號。
下面我給出一個小demo,基于在請求的url中加入版本號,擴展可以根據自己的需要。
一、新建springboot項目
新建一個springboot項目,pom.xml的配置如下:
<?xml version="1.0" encoding="UTF-8"?>
<project xmlns="http://maven.apache.org/POM/4.0.0" xmlns:xsi="http://www.w3.org/2001/XMLSchema-instance"
 xsi:schemaLocation="http://maven.apache.org/POM/4.0.0 http://maven.apache.org/xsd/maven-4.0.0.xsd">
 <modelVersion>4.0.0</modelVersion>

 <groupId>com.jack</groupId>
 <artifactId>springboot_version</artifactId>
 <version>0.0.1-SNAPSHOT</version>
 <packaging>jar</packaging>
 <name>springboot_version</name>
 <description>Demo project for Spring Boot</description>

 <parent>
  <groupId>org.springframework.boot</groupId>
  <artifactId>spring-boot-starter-parent</artifactId>
  <version>2.0.4.RELEASE</version>
  <relativePath/> <!-- lookup parent from repository -->
 </parent>

 <properties>
  <project.build.sourceEncoding>UTF-8</project.build.sourceEncoding>
  <project.reporting.outputEncoding>UTF-8</project.reporting.outputEncoding>
  <java.version>1.8</java.version>
 </properties>

 <dependencies>
  <dependency>
   <groupId>org.springframework.boot</groupId>
   <artifactId>spring-boot-starter-web</artifactId>
  </dependency>

  <dependency>
   <groupId>org.springframework.boot</groupId>
   <artifactId>spring-boot-starter-test</artifactId>
   <scope>test</scope>
  </dependency>
 </dependencies>

 <build>
  <plugins>
   <plugin>
    <groupId>org.springframework.boot</groupId>
    <artifactId>spring-boot-maven-plugin</artifactId>
   </plugin>
  </plugins>
 </build>
</project>
配置文件如下:
server:
  port: 9090
二、實現自定義版本控制的代碼
1,自定義版本控制的注解
package com.jack.springboot_version.annotation;
import org.springframework.web.bind.annotation.Mapping;
import java.lang.annotation.*;

/**
 * create by jack 2018/8/19
 *
 * @auther jack
 * @date: 2018/8/19 10:44
 * @Description:
 *版本控制注解
 */
@Target({ElementType.METHOD,ElementType.TYPE})
@Retention(RetentionPolicy.RUNTIME)
@Documented
@Mapping
public @interface ApiVersion {
    /**
     * 標識版本號
     * @return
     */
    int value();
}
2,自定義url匹配邏輯
package com.jack.springboot_version.config;
import org.springframework.lang.Nullable;
import org.springframework.web.servlet.mvc.condition.RequestCondition;
import javax.servlet.http.HttpServletRequest;
import java.util.regex.Matcher;
import java.util.regex.Pattern;

/**
 * create by jack 2018/8/19
 *
 * @auther jack
 * @date: 2018/8/19 10:57
 * @Description:
 */
public class ApiVersionCondition implements RequestCondition<ApiVersionCondition> {
    // 路徑中版本的前綴, 這里用 /v[1-9]/的形式
    private final static Pattern VERSION_PREFIX_PATTERN = Pattern.compile("v(d+)/");

    /**
     * api的版本
     */
    private int apiVersion;
    public ApiVersionCondition(int apiVersion) {
        this.apiVersion = apiVersion;
    }

    /**
     * 將不同的篩選條件合并
     * @param apiVersionCondition
     * @return
     */
    @Override
    public ApiVersionCondition combine(ApiVersionCondition apiVersionCondition) {
        //return null;
        // 采用最后定義優先原則,則方法上的定義覆蓋類上面的定義
        return new ApiVersionCondition(apiVersionCondition.getApiVersion());
    }

    /**
     * 根據request查找匹配到的篩選條件
     * @param httpServletRequest
     * @return
     */
    @Nullable
    @Override
    public ApiVersionCondition getMatchingCondition(HttpServletRequest httpServletRequest) {
        //return null;
        Matcher m = VERSION_PREFIX_PATTERN.matcher(httpServletRequest.getRequestURI());
        if(m.find()){
            Integer version = Integer.valueOf(m.group(1));
            if(version >= this.apiVersion)
            {
                return this;
            }
        }
        return null;
    }

    /**
     * 不同篩選條件比較,用于排序
     * @param apiVersionCondition
     * @param httpServletRequest
     * @return
     */
    @Override
    public int compareTo(ApiVersionCondition apiVersionCondition, HttpServletRequest httpServletRequest) {
        //return 0;
        // 優先匹配最新的版本號
        return apiVersionCondition.getApiVersion() - this.apiVersion;
    }
    public int getApiVersion() {
        return apiVersion;
    }
}
3,自定義匹配的處理器
package com.jack.springboot_version.config;
import com.jack.springboot_version.annotation.ApiVersion;
import org.springframework.core.annotation.AnnotationUtils;
import org.springframework.web.servlet.mvc.condition.RequestCondition;
import org.springframework.web.servlet.mvc.method.annotation.RequestMappingHandlerMapping;
import java.lang.reflect.Method;

/**
 * create by jack 2018/8/19
 *
 * @auther jack
 * @date: 2018/8/19 10:49
 * @Description:
 * 重寫RequestMappingHandlerMapping類的一些方法
 */
public class CustomRequestMappingHandlerMapping extends RequestMappingHandlerMapping {
    @Override
    protected RequestCondition<ApiVersionCondition> getCustomTypeCondition(Class<?> handlerType) {
        ApiVersion apiVersion = AnnotationUtils.findAnnotation(handlerType, ApiVersion.class);
        return createCondition(apiVersion);
    }

    @Override
    protected RequestCondition<ApiVersionCondition> getCustomMethodCondition(Method method) {
        ApiVersion apiVersion = AnnotationUtils.findAnnotation(method, ApiVersion.class);
        return createCondition(apiVersion);
    }

    private RequestCondition<ApiVersionCondition> createCondition(ApiVersion apiVersion) {
        return apiVersion == null ? null : new ApiVersionCondition(apiVersion.value());
    }
}
4,自定義WebMvcConfigurationSupport
核心代碼如下:
package com.jack.springboot_version.config;
import org.springframework.boot.SpringBootConfiguration;
import org.springframework.web.servlet.config.annotation.WebMvcConfigurationSupport;
import org.springframework.web.servlet.mvc.method.annotation.RequestMappingHandlerMapping;

/**
 * create by jack 2018/8/19
 *
 * @auther jack
 * @date: 2018/8/19 10:50
 * @Description:
 */
@SpringBootConfiguration
public class WebConfig extends WebMvcConfigurationSupport {

    /**
     * 重寫請求過處理的方法
     * @return
     */
    @Override
    public RequestMappingHandlerMapping requestMappingHandlerMapping() {
        //return super.requestMappingHandlerMapping();
        RequestMappingHandlerMapping handlerMapping = new CustomRequestMappingHandlerMapping();
        handlerMapping.setOrder(0);
        return handlerMapping;
    }
}
三、編寫測試的控制器
1,版本1的控制器:
package com.jack.springboot_version.controller.v1;
import com.jack.springboot_version.annotation.ApiVersion;
import org.springframework.web.bind.annotation.RequestMapping;
import org.springframework.web.bind.annotation.RestController;

/**
 * create by jack 2018/8/19
 *
 * @auther jack
 * @date: 2018/8/19 10:52
 * @Description:
 */
@ApiVersion(1)
@RestController
@RequestMapping("{version}/hello")
public class Hello1Controller {

    @RequestMapping("/world")
    public String helloWorld(){
        System.out.println("版本是1的接口");
        return "hello,world .version is 1";
    }

}
2,版本2的控制器:
package com.jack.springboot_version.controller.v2;
import com.jack.springboot_version.annotation.ApiVersion;
import org.springframework.web.bind.annotation.RequestMapping;
import org.springframework.web.bind.annotation.RestController;

/**
 * create by jack 2018/8/19
 *
 * @auther jack
 * @date: 2018/8/19 10:52
 * @Description:
 */
@ApiVersion(2)
@RestController
@RequestMapping("{version}/hello")
public class Hello2Controller {
    @RequestMapping("/world")
    public String helloWorld(){
        System.out.println("版本是2的接口");
        return "hello,world .version is 2";
    }
}
四、測試demo
使用postman進行測試:
1,測試版本1,:
測試url:http://localhost:9090/v1/hello/world
測試結果:

2,測試版本2,:
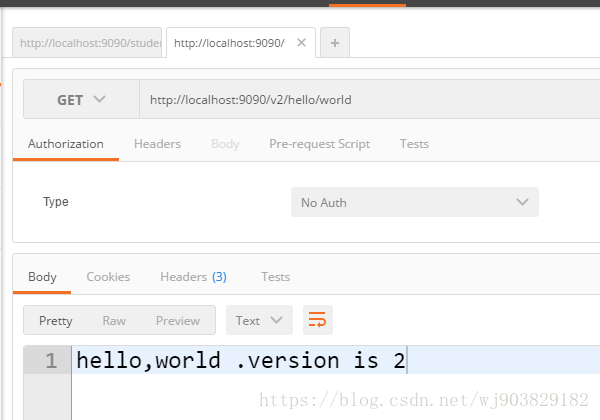
測試url:http://localhost:9090/v2/hello/world
測試結果:

git:https://github.com/wj903829182/springcloud5/tree/master/springboot_version
總結:通過自定義springmvc的url匹配規則,實現接口的版本控制,url增加了版本號,如果不存在高版本的版本接口則匹配代碼中版本號最高的處理邏輯。使用版本號對我們項目的接口的迭代開發提供了方便。
springboot 兩個版本的差異
背景:前幾天被人問到了SpringBoot 使用的是哪個版本的?兩個版本的差異?完全Hold不住,今天記起來去稍微了解下。
如今市面上就有SpringBoot2.X.X 和SpringBoot1.X.X 兩個新舊大版本。其中,SpringBoot1和SpringBoot2主要區別有如下兩個方面(MVC部分):
一、WebMvcConfigurerAdapter
WebMvcConfigurerAdapter該抽象類在新版的SpringBoot中有改動,部分方法過時。由于SpringBoot的2.0 及其以上版本最低已支持Java1.8,而Java1.8中有個defualt關鍵字的新特性,于是SpringBoot 2.0.0 對WebMvcConfigurerAdapter該抽象類的上層接口WebMvcConfigurer進行了改造,將WebMvcConfigurer中的方法全部改為使用default關鍵字修飾;因此,SpringBoot2版本在使用WebMvcConfigurerAdapter抽象類時不需要再使用適配器進行適配。
WebMvcConfigurer部分代碼如下:
public interface WebMvcConfigurer {
    /**
     * Helps with configuring HandlerMappings path matching options such as trailing slash match,
     * suffix registration, path matcher and path helper.
     * Configured path matcher and path helper instances are shared for:
     * <ul>
     * <li>RequestMappings</li>
     * <li>ViewControllerMappings</li>
    * <li>ResourcesMappings</li>
    * </ul>
    * @since 4.0.3
    */
   void configurePathMatch(PathMatchConfigurer configurer);
   /**
    * Configure content negotiation options.
    */
   void configureContentNegotiation(ContentNegotiationConfigurer configurer);
   /**
    * Configure asynchronous request handling options.
    */
   void configureAsyncSupport(AsyncSupportConfigurer configurer);
   /**
    * Configure a handler to delegate unhandled requests by forwarding to the
    * Servlet container"s "default" servlet. A common use case for this is when
    * the {@link DispatcherServlet} is mapped to "/" thus overriding the
    * Servlet container"s default handling of static resources.
    */
   void configureDefaultServletHandling(DefaultServletHandlerConfigurer configurer);
   /**
    * Add {@link Converter}s and {@link Formatter}s in addition to the ones
    * registered by default.
    */
   void addFormatters(FormatterRegistry registry);
更直接的說,就是WebMvcConfigurerAdapter 被WebMvcConfigurer 接口替代了,可以直接通過繼承WebMvcConfigurer接口,然后實現它的defalut方法來使用WebMvcConfigurerAdapter。
除此之外,WebMvcConfigurerAdapter 還可以用 WebMvcConfigurationSupport 替代,只不過使用WebMvcConfigurationSupport這個類來替換WebMvcConfigurerAdapter時會全面接管對SpringMVC的配置,即SpringBoot對SpringMVC的自動配置全部失效,均使用用戶對SpringMVC的配置。
二、SpringMVC攔截器攔截靜態資源
SpringBoot1舊版本中配置的攔截器對靜態資源默認是放行不攔截對,而在SpringBoot 2.0.0及其以上版本的攔截器不會對靜態資源默認放行,同樣也會進行攔截。此時,就需要為使用到的靜態資源排除排除其請求路徑,這樣在使用SpringBoot2新版本時攔截器才不會攔截靜態資源。
排除攔截靜態資源示例如下:
@Override
public void addInterceptors(InterceptorRegistry registry) {
registry.addInterceptor(new LoginHandlerIntercepter()).addPathPatterns("/**") .excludePathPatterns("/asserts/**","/webjars/**"); }
以上為個人經驗,希望能給大家一個參考,也希望大家多多支持服務器之家。
原文鏈接:https://jackwang.blog.csdn.net/article/details/81836551


