前言
最近在學習網絡原理,突然萌發出自己實現一個網絡服務器的想法,并且由于第三代小白機器人的開發需要,我把之前使用python、PHP寫的那部分代碼都遷移到了C#(別問我為什么這么喜歡C#),之前使用PHP就是用來處理網絡請求的,現在遷移到C#了,而Linux系統上并沒有IIS服務器,自然不能使用ASP.Net,所以這個時候自己實現一個功能簡單的網絡服務器就恰到好處地解決這些問題了。
基本原理
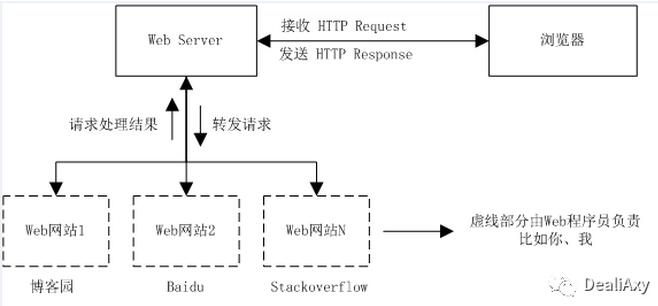
Web Server在一個B/S架構系統中起到的作用不僅多而且相當重要,Web開發者大部分時候并不需要了解它的詳細工作機制。雖然不同的Web Server可能功能并不完全一樣,但是以下三個功能幾乎是所有Web Server必須具備的:
接收來自瀏覽器端的HTTP請求
將請求轉發給指定Web站點程序(后者由Web開發者編寫,負責處理請求)
向瀏覽器發送請求處理結果
下圖顯示Web Server在整個Web架構系統中所處的重要位置:

如上圖,Web Server起到了一個“承上啟下”的作用(雖然并沒有“上下”之分),它負責連接用戶和Web站點。
每個網站就像一個個“插件”,只要網站開發過程中遵循了Web Server提出的規則,那么該網站就可以“插”在Web Server上,我們便可以通過瀏覽器訪問網站。
太長不看版原理
瀏覽器想要拿到哪個文件(html、css、js、image)就和服務器發請求信息說我要這個文件,然后服務器檢查請求合不合法,如果合法就把文件數據傳回給瀏覽器,這樣瀏覽器就可以把網站顯示出來了。(一個網站一般會包含n多個文件)
話不多說,直接上代碼
在C#中有兩種方法可以簡單實現Web服務器,分別是直接使用Socket和使用封裝好的HttpListener。
因為后者比較方便一些,所以我選擇使用后者。
這是最簡單的實現一個網絡服務器,可以處理瀏覽器發過來的請求,然后將指定的字符串內容返回。
|
1
2
3
4
5
6
7
8
9
10
11
12
13
14
15
16
17
18
19
20
21
22
23
24
25
26
27
28
29
30
31
32
33
|
class Program{ static void Main(string[] args) { string port = "8080"; HttpListener httpListener = new HttpListener(); httpListener.Prefixes.Add(string.Format("http://+:{0}/", port)); httpListener.Start(); httpListener.BeginGetContext(new AsyncCallback(GetContext), httpListener); //開始異步接收request請求 Console.WriteLine("監聽端口:" + port); Console.Read(); } static void GetContext(IAsyncResult ar) { HttpListener httpListener = ar.AsyncState as HttpListener; HttpListenerContext context = httpListener.EndGetContext(ar); //接收到的請求context(一個環境封裝體) httpListener.BeginGetContext(new AsyncCallback(GetContext), httpListener); //開始 第二次 異步接收request請求 HttpListenerRequest request = context.Request; //接收的request數據 HttpListenerResponse response = context.Response; //用來向客戶端發送回復 response.ContentType = "html"; response.ContentEncoding = Encoding.UTF8; using (Stream output = response.OutputStream) //發送回復 { byte[] buffer = Encoding.UTF8.GetBytes("要返回的內容"); output.Write(buffer, 0, buffer.Length); } }} |
這個簡單的代碼已經可以實現用于小白機器人的網絡請求處理了,因為大致只用到GET和POST兩種HTTP方法,只需要在GetContext方法里判斷GET、POST方法,然后分別給出響應就可以了。
但是我們的目的是開發一個真正的網絡服務器,當然不能只滿足于這樣一個專用的服務器,我們要的是可以提供網頁服務的服務器。
那就繼續吧。
根據我的研究,提供網頁訪問服務的服務器做起來確實有一點麻煩,因為需要處理的東西很多。需要根據瀏覽器請求的不同文件給出不同響應,處理Cookies,還要處理編碼,還有各種出錯的處理。
首先我們要確定一下我們的服務器要提供哪些文件的訪問服務。
這里我用一個字典結構來保存。
|
1
2
3
4
5
6
7
8
9
10
11
12
13
14
15
16
17
18
19
20
21
22
23
|
/// <summary>/// MIME類型/// </summary>public Dictionary<string, string> MIME_Type = new Dictionary<string, string>(){ { "htm", "text/html" }, { "html", "text/html" }, { "php", "text/html" }, { "xml", "text/xml" }, { "json", "application/json" }, { "txt", "text/plain" }, { "js", "application/x-javascript" }, { "css", "text/css" }, { "bmp", "image/bmp" }, { "ico", "image/ico" }, { "png", "image/png" }, { "gif", "image/gif" }, { "jpg", "image/jpeg" }, { "jpeg", "image/jpeg" }, { "webp", "image/webp" }, { "zip", "application/zip"}, { "*", "*/*" }}; |
劇透一下:其中有PHP類型是我們后面要使用CGI接入的方式使我們的服務器支持PHP。
我在QFramework中封裝了一個QHttpWebServer模塊,這是其中的啟動代碼。
|
1
2
3
4
5
6
7
8
9
10
11
12
13
14
15
16
17
18
19
20
21
22
23
24
25
26
|
/// <summary>/// 啟動本地網頁服務器/// </summary>/// <param name="webroot">網站根目錄</param>/// <returns></returns>public bool Start(string webroot){ //觸發事件 if (OnServerStart != null) OnServerStart(httpListener); WebRoot = webroot; try { //監聽端口 httpListener.Prefixes.Add("http://+:" + port.ToString() + "/"); httpListener.Start(); httpListener.BeginGetContext(new AsyncCallback(onWebResponse), httpListener); //開始異步接收request請求 } catch (Exception ex) { Qdb.Error(ex.Message, QDebugErrorType.Error, "Start"); return false; } return true;} |
現在把網頁服務器的核心處理代碼貼出來。
這個代碼只是做了基本的處理,對于網站的主頁只做了html后綴的識別。
后來我在QFramework中封裝的模塊做了更多的細節處理。
|
1
2
3
4
5
6
7
8
9
10
11
12
13
14
15
16
17
18
19
20
21
22
23
24
25
26
27
28
29
30
31
32
33
34
35
36
37
38
39
40
41
42
43
44
45
46
47
48
49
50
51
52
53
54
55
56
57
58
59
60
61
62
63
64
65
66
67
68
69
70
71
72
73
74
75
76
77
78
79
80
|
/// <summary>/// 網頁服務器相應處理/// </summary>/// <param name="ar"></param>private void onWebResponse(IAsyncResult ar){ byte[] responseByte = null; //響應數據 HttpListener httpListener = ar.AsyncState as HttpListener; HttpListenerContext context = httpListener.EndGetContext(ar); //接收到的請求context(一個環境封裝體) httpListener.BeginGetContext(new AsyncCallback(onWebResponse), httpListener); //開始 第二次 異步接收request請求 //觸發事件 if (OnGetRawContext != null) OnGetRawContext(context); HttpListenerRequest request = context.Request; //接收的request數據 HttpListenerResponse response = context.Response; //用來向客戶端發送回復 //觸發事件 if (OnGetRequest != null) OnGetRequest(request, response); if (rawUrl == "" || rawUrl == "/") //單純輸入域名或主機IP地址 fileName = WebRoot + @"\index.html"; else if (rawUrl.IndexOf('.') == -1) //不帶擴展名,理解為文件夾 fileName = WebRoot + @"\" + rawUrl.SubString(1) + @"\index.html"; else { int fileNameEnd = rawUrl.IndexOf('?'); if (fileNameEnd > -1) fileName = rawUrl.Substring(1, fileNameEnd - 1); fileName = WebRoot + @"\" + rawUrl.Substring(1); } //處理請求文件名的后綴 string fileExt = Path.GetExtension(fileName).Substring(1); if (!File.Exists(fileName)) { responseByte = Encoding.UTF8.GetBytes("404 Not Found!"); response.StatusCode = (int)HttpStatusCode.NotFound; } else { try { responseByte = File.ReadAllBytes(fileName); response.StatusCode = (int)HttpStatusCode.OK; } catch (Exception ex) { Qdb.Error(ex.Message, QDebugErrorType.Error, "onWebResponse"); response.StatusCode = (int)HttpStatusCode.InternalServerError; } } if (MIME_Type.ContainsKey(fileExt)) response.ContentType = MIME_Type[fileExt]; else response.ContentType = MIME_Type["*"]; response.Cookies = request.Cookies; //處理Cookies response.ContentEncoding = Encoding.UTF8; using (Stream output = response.OutputStream) //發送回復 { try { output.Write(responseByte, 0, responseByte.Length); } catch (Exception ex) { Qdb.Error(ex.Message, QDebugErrorType.Error, "onWebResponse"); response.StatusCode = (int)HttpStatusCode.InternalServerError; } }} |
這樣就可以提供基本的網頁訪問了,經過測試,使用Bootstrap,Pure等前端框架的網頁都可以完美訪問,性能方面一般般。(在QFramework的封裝中我做了一點性能優化,有一點提升)我覺得要在性能方面做提升還是要在多線程處理這方面做優化,由于篇幅關系,就不把多線程版本的代碼貼出來了。
接下來我們還要實現服務器的PHP支持。
首先定義兩個字段。
|
1
2
3
4
5
6
7
8
9
10
11
12
13
14
15
16
17
18
19
20
21
22
23
24
25
26
27
28
29
30
31
32
33
34
35
36
37
38
39
40
41
42
43
44
45
46
47
48
49
50
51
52
53
54
55
56
57
58
59
60
61
62
63
64
65
66
67
68
69
70
71
72
73
74
75
76
77
78
79
80
81
|
/// <summary>/// 是否開啟PHP功能/// </summary>public bool PHP_CGI_Enabled = true;/// <summary>/// PHP執行文件路徑/// </summary>public string PHP_CGI_Path = "php-cgi";接下來在網頁服務的核心代碼里做PHP支持的處理。//PHP處理string phpCgiOutput = "";Action phpProc = new Action(() =>{ try { string argStr = ""; if (request.HttpMethod == "GET") { if (rawUrl.IndexOf('?') > -1) argStr = rawUrl.Substring(rawUrl.IndexOf('?')); } else if (request.HttpMethod == "POST") { using (StreamReader reader = new StreamReader(request.InputStream)) { argStr = reader.ReadToEnd(); } } Process p = new Process(); p.StartInfo.CreateNoWindow = false; //不顯示窗口 p.StartInfo.RedirectStandardOutput = true; //重定向輸出 p.StartInfo.RedirectStandardInput = false; //重定向輸入 p.StartInfo.UseShellExecute = false; //是否指定操作系統外殼進程啟動程序 p.StartInfo.FileName = PHP_CGI_Path; p.StartInfo.Arguments = string.Format("-q -f {0} {1}", fileName, argStr); p.Start(); StreamReader sr = p.StandardOutput; while (!sr.EndOfStream) { phpCgiOutput += sr.ReadLine() + Environment.NewLine; } responseByte = sr.CurrentEncoding.GetBytes(phpCgiOutput); } catch (Exception ex) { Qdb.Error(ex.Message, QDebugErrorType.Error, "onWebResponse->phpProc"); response.StatusCode = (int)HttpStatusCode.InternalServerError; }});if (fileExt == "php" && PHP_CGI_Enabled){ phpProc();}else{ if (!File.Exists(fileName)) { responseByte = Encoding.UTF8.GetBytes("404 Not Found!"); response.StatusCode = (int)HttpStatusCode.NotFound; } else { try { responseByte = File.ReadAllBytes(fileName); response.StatusCode = (int)HttpStatusCode.OK; } catch (Exception ex) { Qdb.Error(ex.Message, QDebugErrorType.Error, "onWebResponse"); response.StatusCode = (int)HttpStatusCode.InternalServerError; } }} |
這樣就實現了基于PHP-CGI的PHP支持了,經過測試,基本的php頁面都可以支持,但是需要使用curl和xml這類擴展的暫時還沒辦法。需要做更多的工作。
接下來我會給服務器做一個GUI界面,供大家測試。
同時也會把QFramework框架發布,有興趣的可以使用基于QFramework的服務器封裝。
以上就是本文的全部內容,希望對大家的學習有所幫助,也希望大家多多支持服務器之家。
原文鏈接:http://www.cnblogs.com/deali/p/7676484.html


