一、簡介
springboot 最強大的功能就是把我們常用的場景抽取成了一個個starter(場景啟動器),我們通過引入springboot 為我提供的這些場景啟動器,我們再進行少量的配置就能使用相應的功能。即使是這樣,springboot也不能囊括我們所有的使用場景,往往我們需要自定義starter,來簡化我們對springboot的使用。
下面話不多說了,來一起看看詳細的介紹吧
二、如何自定義starter
1.實例
如何編寫自動配置 ?
我們參照@webmvcautoconfiguration為例,我們看看需要準備哪些東西,下面是webmvcautoconfiguration的部分代碼:
|
1
2
3
4
5
6
7
8
9
10
11
12
13
14
15
16
17
18
19
20
21
22
|
@configuration@conditionalonwebapplication@conditionalonclass({servlet.class, dispatcherservlet.class, webmvcconfigureradapter.class})@conditionalonmissingbean({webmvcconfigurationsupport.class})@autoconfigureorder(-2147483638)@autoconfigureafter({dispatcherservletautoconfiguration.class, validationautoconfiguration.class})public class webmvcautoconfiguration { @import({webmvcautoconfiguration.enablewebmvcconfiguration.class}) @enableconfigurationproperties({webmvcproperties.class, resourceproperties.class}) public static class webmvcautoconfigurationadapter extends webmvcconfigureradapter { @bean @conditionalonbean({view.class}) @conditionalonmissingbean public beannameviewresolver beannameviewresolver() { beannameviewresolver resolver = new beannameviewresolver(); resolver.setorder(2147483637); return resolver; } }} |
我們可以抽取到我們自定義starter時,同樣需要的一些配置。
|
1
2
3
4
5
6
7
8
9
10
11
|
@configuration //指定這個類是一個配置類@conditionalonxxx //指定條件成立的情況下自動配置類生效@autoconfigureorder //指定自動配置類的順序@bean //向容器中添加組件@configurationproperties //結合相關xxxproperties來綁定相關的配置@enableconfigurationproperties //讓xxxproperties生效加入到容器中自動配置類要能加載需要將自動配置類,配置在meta-inf/spring.factories中org.springframework.boot.autoconfigure.enableautoconfiguration=\org.springframework.boot.autoconfigure.admin.springapplicationadminjmxautoconfiguration,\org.springframework.boot.autoconfigure.aop.aopautoconfiguration,\ |
模式
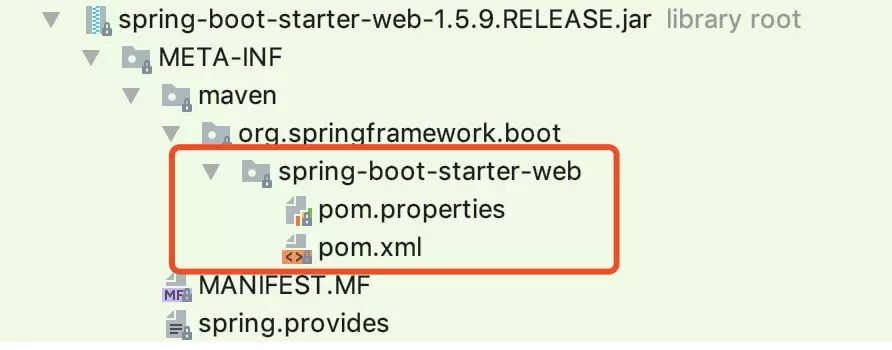
我們參照 spring-boot-starter 我們發現其中沒有代碼:

我們在看它的pom中的依賴中有個 springboot-starter
|
1
2
3
4
|
<dependency> <groupid>org.springframework.boot</groupid> <artifactid>spring-boot-starter</artifactid></dependency> |
我們再看看 spring-boot-starter 有個 spring-boot-autoconfigure
|
1
2
3
4
|
<dependency> <groupid>org.springframework.boot</groupid> <artifactid>spring-boot-autoconfigure</artifactid></dependency> |
關于web的一些自動配置都寫在了這里 ,所以我們有以下總結:
啟動器starter只是用來做依賴管理
需要專門寫一個類似spring-boot-autoconfigure的配置模塊
用的時候只需要引入啟動器starter,就可以使用自動配置了
命名規范
官方命名空間
- 前綴:spring-boot-starter-
- 模式:spring-boot-starter-模塊名
- 舉例:spring-boot-starter-web、spring-boot-starter-jdbc
自定義命名空間
- 后綴:-spring-boot-starter
- 模式:模塊-spring-boot-starter
- 舉例:mybatis-spring-boot-starter
三、自定義starter實例
我們需要先創建兩個工程 hello-spring-boot-starter 和 hello-spring-boot-starter-autoconfigurer
1. hello-spring-boot-starter
1.pom.xml
|
1
2
3
4
5
6
7
8
9
10
11
12
13
14
15
16
17
18
19
20
21
22
|
<?xml version="1.0" encoding="utf-8"?><project xmlns="http://maven.apache.org/pom/4.0.0" xmlns:xsi="http://www.w3.org/2001/xmlschema-instance" xsi:schemalocation="http://maven.apache.org/pom/4.0.0 http://maven.apache.org/xsd/maven-4.0.0.xsd"> <modelversion>4.0.0</modelversion> <groupid>com.gf</groupid> <artifactid>hello-spring-boot-starter</artifactid> <version>0.0.1-snapshot</version> <packaging>jar</packaging> <name>hello-spring-boot-starter</name> <!-- 啟動器 --> <dependencies> <!-- 引入自動配置模塊 --> <dependency> <groupid>com.gf</groupid> <artifactid>hello-spring-boot-starter-autoconfigurer</artifactid> <version>0.0.1-snapshot</version> </dependency> </dependencies></project> |
同時刪除 啟動類、resources下的文件,test文件。
2. hello-spring-boot-starter-autoconfigurer
1. pom.xml
|
1
2
3
4
5
6
7
8
9
10
11
12
13
14
15
16
17
18
19
20
21
22
23
24
25
26
27
28
29
30
31
32
33
34
35
|
<?xml version="1.0" encoding="utf-8"?><project xmlns="http://maven.apache.org/pom/4.0.0" xmlns:xsi="http://www.w3.org/2001/xmlschema-instance" xsi:schemalocation="http://maven.apache.org/pom/4.0.0 http://maven.apache.org/xsd/maven-4.0.0.xsd"> <modelversion>4.0.0</modelversion> <groupid>com.gf</groupid> <artifactid>hello-spring-boot-starter-autoconfigurer</artifactid> <version>0.0.1-snapshot</version> <packaging>jar</packaging> <name>hello-spring-boot-starter-autoconfigurer</name> <description>demo project for spring boot</description> <parent> <groupid>org.springframework.boot</groupid> <artifactid>spring-boot-starter-parent</artifactid> <version>1.5.9.release</version> <relativepath/> <!-- lookup parent from repository --> </parent> <properties> <project.build.sourceencoding>utf-8</project.build.sourceencoding> <project.reporting.outputencoding>utf-8</project.reporting.outputencoding> <java.version>1.8</java.version> </properties> <dependencies> <!-- 引入spring-boot-starter,所有starter的基本配合 --> <dependency> <groupid>org.springframework.boot</groupid> <artifactid>spring-boot-starter</artifactid> </dependency> </dependencies></project> |
2. helloproperties
|
1
2
3
4
5
6
7
8
9
10
11
12
13
14
15
16
17
18
19
20
21
22
23
24
25
26
|
package com.gf.service;import org.springframework.boot.context.properties.configurationproperties;@configurationproperties(prefix = "gf.hello")public class helloproperties { private string prefix; private string suffix; public string getprefix() { return prefix; } public void setprefix(string prefix) { this.prefix = prefix; } public string getsuffix() { return suffix; } public void setsuffix(string suffix) { this.suffix = suffix; }} |
3. helloservice
|
1
2
3
4
5
6
7
8
9
10
11
12
13
14
15
16
17
18
19
|
package com.gf.service;public class helloservice { helloproperties helloproperties; public helloproperties gethelloproperties() { return helloproperties; } public void sethelloproperties(helloproperties helloproperties) { this.helloproperties = helloproperties; } public string sayhello(string name ) { return helloproperties.getprefix()+ "-" + name + helloproperties.getsuffix(); }} |
4. helloserviceautoconfiguration
|
1
2
3
4
5
6
7
8
9
10
11
12
13
14
15
16
17
18
19
20
21
22
23
|
package com.gf.service;import org.springframework.beans.factory.annotation.autowired;import org.springframework.boot.autoconfigure.condition.conditionalonwebapplication;import org.springframework.boot.context.properties.enableconfigurationproperties;import org.springframework.context.annotation.bean;import org.springframework.context.annotation.configuration;@configuration@conditionalonwebapplication //web應該生效@enableconfigurationproperties(helloproperties.class)public class helloserviceautoconfiguration { @autowired helloproperties helloproperties; @bean public helloservice helloservice() { helloservice service = new helloservice(); service.sethelloproperties( helloproperties ); return service; }} |
5. spring.factories
在 resources 下創建文件夾 meta-inf 并在 meta-inf 下創建文件 spring.factories ,內容如下:
|
1
2
3
|
# auto configureorg.springframework.boot.autoconfigure.enableautoconfiguration=\com.gf.service.helloserviceautoconfiguration |
到這兒,我們的配置自定義的starter就寫完了 ,我們把 hello-spring-boot-starter-autoconfigurer、hello-spring-boot-starter 安裝成本地jar包。
三、測試自定義starter
我們創建個項目 hello-spring-boot-starter-test,來測試系我們寫的stater。
1. pom.xml
|
1
2
3
4
5
6
7
8
9
10
11
12
13
14
15
16
17
18
19
20
21
22
23
24
25
26
27
28
29
30
31
32
33
34
35
36
37
38
39
40
41
42
43
44
45
46
47
48
49
50
51
52
53
54
55
|
<?xml version="1.0" encoding="utf-8"?><project xmlns="http://maven.apache.org/pom/4.0.0" xmlns:xsi="http://www.w3.org/2001/xmlschema-instance" xsi:schemalocation="http://maven.apache.org/pom/4.0.0 http://maven.apache.org/xsd/maven-4.0.0.xsd"> <modelversion>4.0.0</modelversion> <groupid>com.gf</groupid> <artifactid>hello-spring-boot-starter-test</artifactid> <version>0.0.1-snapshot</version> <packaging>jar</packaging> <name>hello-spring-boot-starter-test</name> <description>demo project for spring boot</description> <parent> <groupid>org.springframework.boot</groupid> <artifactid>spring-boot-starter-parent</artifactid> <version>1.5.9.release</version> <relativepath/> <!-- lookup parent from repository --> </parent> <properties> <project.build.sourceencoding>utf-8</project.build.sourceencoding> <project.reporting.outputencoding>utf-8</project.reporting.outputencoding> <java.version>1.8</java.version> </properties> <dependencies> <dependency> <groupid>org.springframework.boot</groupid> <artifactid>spring-boot-starter-web</artifactid> </dependency> <!-- 引入自定義starter --> <dependency> <groupid>com.gf</groupid> <artifactid>hello-spring-boot-starter</artifactid> <version>0.0.1-snapshot</version> </dependency> <dependency> <groupid>org.springframework.boot</groupid> <artifactid>spring-boot-starter-test</artifactid> <scope>test</scope> </dependency> </dependencies> <build> <plugins> <plugin> <groupid>org.springframework.boot</groupid> <artifactid>spring-boot-maven-plugin</artifactid> </plugin> </plugins> </build></project> |
2. hellocontroller
|
1
2
3
4
5
6
7
8
9
10
11
12
13
14
15
16
17
18
19
|
package com.gf.controller;import com.gf.service.helloservice;import org.springframework.beans.factory.annotation.autowired;import org.springframework.web.bind.annotation.getmapping;import org.springframework.web.bind.annotation.pathvariable;import org.springframework.web.bind.annotation.restcontroller;@restcontrollerpublic class hellocontroller { @autowired helloservice helloservice; @getmapping("/hello/{name}") public string hello(@pathvariable(value = "name") string name) { return helloservice.sayhello( name + " , " ); }} |
3. application.properties
|
1
2
|
gf.hello.prefix = higf.hello.suffix = what's up man ? |
我運行項目訪問 http://127.0.0.1:8080/hello/zhangsan,結果如下:
hi-zhangsan , what's up man ?
源碼下載: https://github.com/gf-huanchupk/springbootlearning
總結
以上就是這篇文章的全部內容了,希望本文的內容對大家的學習或者工作具有一定的參考學習價值,謝謝大家對服務器之家的支持。
原文鏈接:https://juejin.im/post/5c81dda6e51d4539ab383e3a


