spring cloud 和 spring boot 可以說是當前最流行的微服務(wù)開發(fā)框架了,在本文中,將向讀者介紹如何在 在 eclipse 中部署 spring boot / spring cloud 應(yīng)用到阿里云。
本地開發(fā)
無論是編寫云端運行的,還是編寫本地運行的 spring boot 應(yīng)用程序,代碼編寫本身并沒有特別大的變化,因此本文采用一個極其基礎(chǔ)的樣例《在 web 頁面打印 helloworld 的 spring boot 》為例,通過啟動內(nèi)置的 tomcat 容器,處理 http 請求,在 web 頁面上打印一串“hello world”的文案。
內(nèi)嵌的 tomcat 監(jiān)聽來自根目錄的請求

|
1
2
3
4
5
6
7
8
9
10
11
12
13
|
package com.aliyun.toolkit.demo;import org.springframework.web.bind.annotation.requestmapping;import org.springframework.web.bind.annotation.restcontroller;@restcontrollerpublic class helloworldcontroller { @requestmapping("/") public string sayhello() { return "alibaba cloud toolkit: hello,world."; }} |
spring boot 的啟動類

|
1
2
3
4
5
6
7
8
9
10
11
12
|
package com.aliyun.toolkit.demo;import org.springframework.boot.springapplication;import org.springframework.boot.autoconfigure.springbootapplication;@springbootapplicationpublic class startup { public static void main(string[] args) { springapplication.run(startup.class,args); }} |
上述代碼就是一個標準的 spring boot 工程。
安裝插件
阿里云提供了基于 eclipse 的插件,以方便開發(fā)人員能夠高效的將本地 ide 中編寫的應(yīng)用程序,極速部署到 ecs中去。
插件主頁:https://www.aliyun.com/product/cloudtoolkit
阿里云的這個 eclipse 插件的安裝過程,和普通的插件大同小異,這里不再贅述,讀者請自行安裝。
配置插件首選項
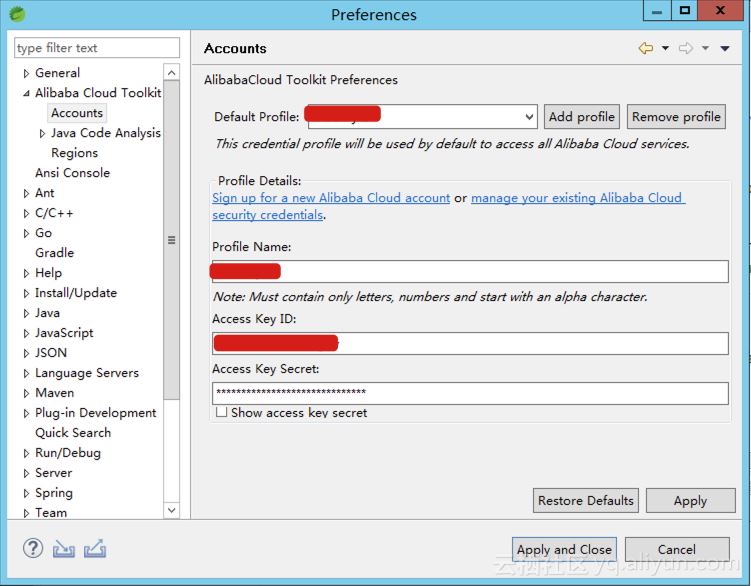
安裝完插件之后,按照如下路徑進行首選項配置
頂部菜單 - window - preferences - alibaba cloud toolkit - accounts
出現(xiàn)如下界面,配置阿里云賬號的 ak 和 sk,即可完成首選項配置。(如果是子賬號,則填寫子賬號的 ak 和 sk)

部署

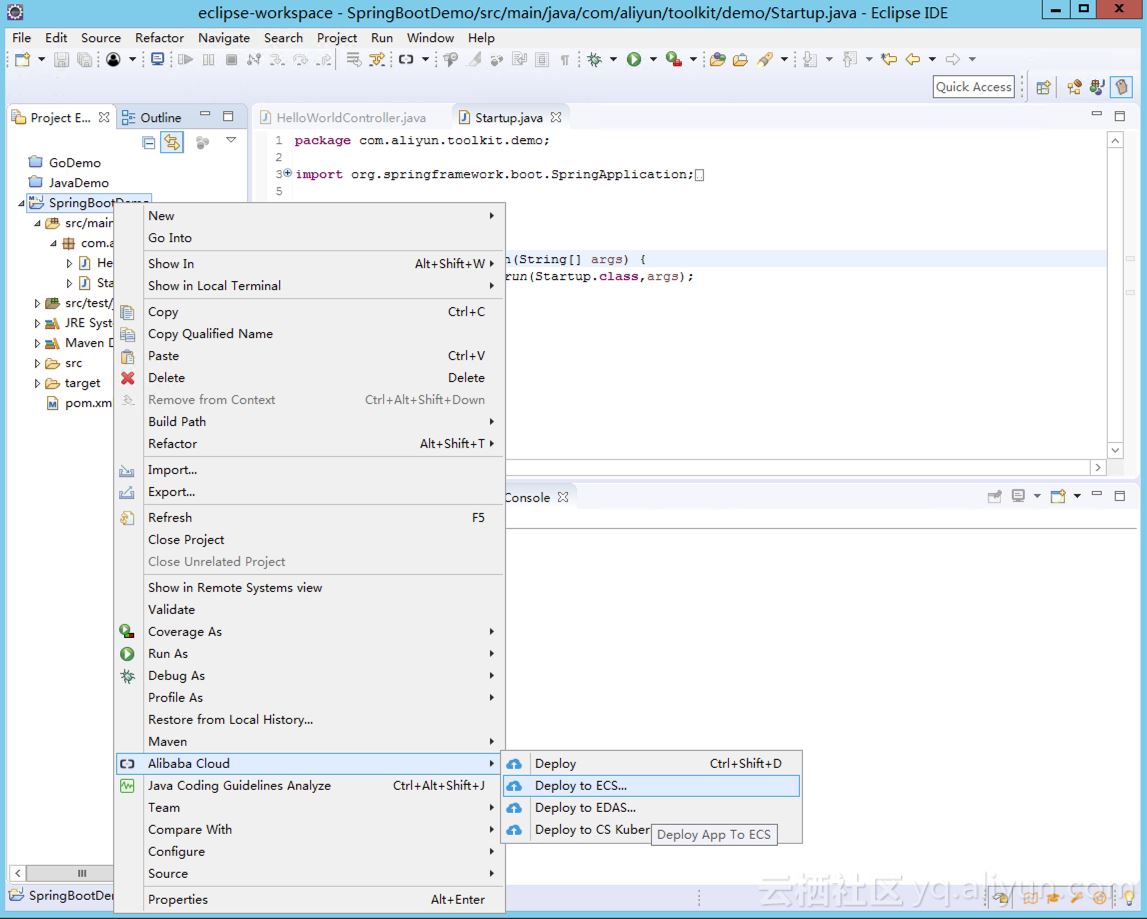
在 eclipse 中,鼠標右鍵項目工程名,在出現(xiàn)的菜單中點擊 alibaba cloud - deploy to ecs...,可會出現(xiàn)如下部署窗口:

在 deployment configurations 對話框設(shè)置部署參數(shù),然后單擊 deploy,即可執(zhí)行部署。
部署參數(shù)說明
-
deploy file:部署文件包含兩種方式。
- maven build:如果當前工程采用 maven 構(gòu)建,可以使用 cloud toolkit 直接構(gòu)建并部署。
- upload file:如果當前工程并非采用 maven 構(gòu)建,或者本地已經(jīng)存在打包好的部署文件,可以選擇并直接上傳本地的部署文件。
- target deploy ecs:在下拉列表中選擇地域,然后在地域中選擇要部署的 ecs 實例。
- deploy location :輸入在 ecs 上部署路徑,如 /root/springbootdemo
- commond:輸入應(yīng)用啟動命令,如 sh /root/springbootdemo/restart.sh。表示在完成應(yīng)用包的部署后,需要執(zhí)行的命令 —— 對于 spring boot 程序而言,通常是一句 java -jar xxxx.jar 的啟動命令。
/root/springbootdemo/restart.sh 內(nèi)容如下:
|
1
2
3
|
source ~/.bash_profilekillall javanohup java -jar /root/springbootdemo/springbootdemo-0.0.1-snapshot.jar > nohup.log 2>&1 & |
以上就是本文的全部內(nèi)容,希望對大家的學習有所幫助,也希望大家多多支持服務(wù)器之家。
原文鏈接:https://yq.aliyun.com/articles/665350


