spring cloud快速搭建
spring cloud是一個微服務(wù)框架,它基于spring boot, spring cloud提供的全套的分布式系統(tǒng)解決方案 。
首先我們使用gradle來創(chuàng)建:
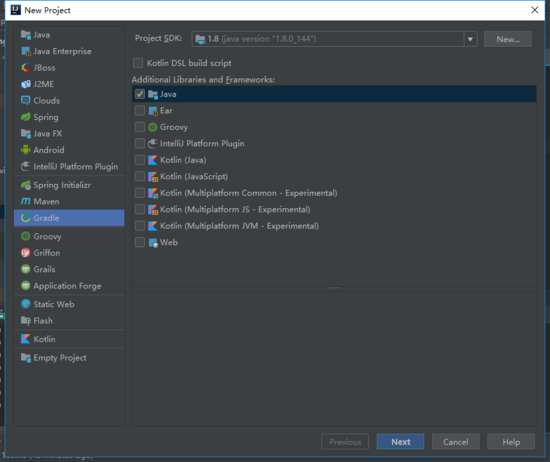
選擇jdk以及勾選java,然后下一步
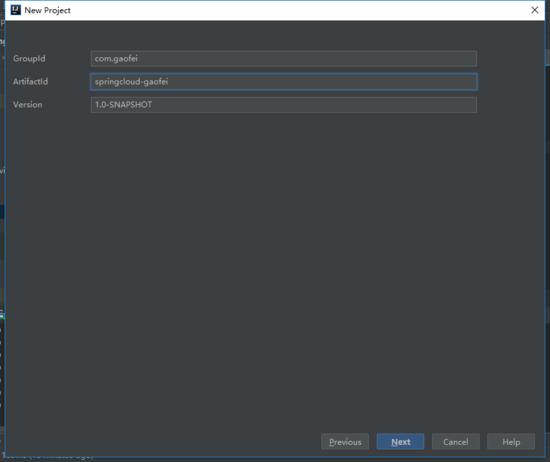
起包名已經(jīng)項目名,下一步:
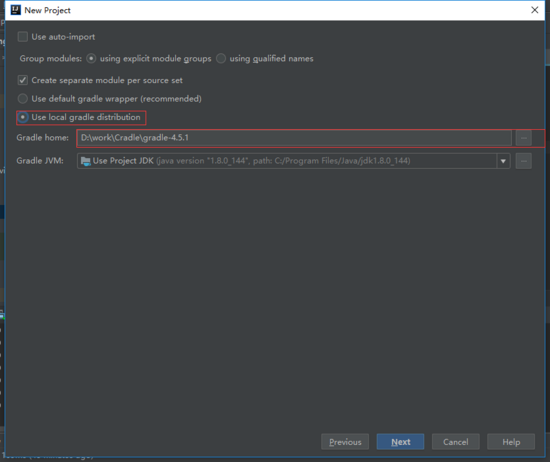
選擇我們本地的gradle包,一直下一步,點(diǎn)擊build.gradle并添加我們的依賴:
|
1
2
3
4
5
6
7
8
9
10
11
12
13
14
15
16
17
18
19
20
21
22
23
24
25
26
27
28
29
30
31
32
33
34
35
36
37
38
39
40
41
42
43
44
45
46
47
48
49
50
51
52
53
54
55
56
57
58
59
60
61
62
63
64
65
66
67
68
69
70
71
72
73
74
75
76
77
78
79
80
81
82
83
84
85
86
87
88
89
90
91
92
93
94
95
96
97
98
|
group 'com.gaofei'version '1.0-snapshot'//gradle使用的插件apply plugin: 'java'//gradle使用spring-boot打包更方便apply plugin: 'spring-boot'//jdk的版本號sourcecompatibility = 1.8//本項目的dependencies { testcompile group: 'junit', name: 'junit', version: '4.12'}//由于本次創(chuàng)建gradle未出現(xiàn)src,由以下代碼來解決task "create-dirs" << { sourcesets*.java.srcdirs*.each { it.mkdirs() } sourcscts*.resources.srcdirs*.each{ it.midirs() }}//編譯構(gòu)建時的配置buildscript { ext{ springbootversion='1.5.10.release' //springbootversion是自己定義的變量 里面寫的是springboot插件的版本 } repositories { maven{ url 'http://maven.aliyun.com/nexus/content/groups/public/'} jcenter() mavencentral() maven{ url "http://repo.spring.io/snapshot" } maven{ url "http://repo.spring.io/milestone" } maven{ url "http://repo.spring.io/release" } maven{ url 'http://repo.spring.io/plugins-snapshot' } } dependencies{ classpath("org.springframework.boot:spring-boot-gradle-plugin:${springbootversion}")//指的是springboot的一個插件 }}//統(tǒng)一所有項目的配置 就是對所有的模塊進(jìn)行統(tǒng)一配置 所有以后的模塊都不用再配置allprojects { group 'com.gaofei' //分組 version '1.0-snapshot' //版本號 ext{ springcloudversion='edgware.sr2' } //所有項目都會引用的阿里云里的maven repositories { maven{ url 'http://maven.aliyun.com/nexus/content/groups/public/'} jcenter() mavencentral() maven{ url "http://repo.spring.io/snapshot" } maven{ url "http://repo.spring.io/milestone" } maven{ url "http://repo.spring.io/release" } maven{ url 'http://repo.spring.io/plugins-snapshot' } }}//統(tǒng)一所有子項目的配置subprojects { apply plugin: 'java' apply plugin: 'idea' apply plugin: 'spring-boot' dependencies { compile('org.springframework.boot:spring-boot-starter-web'){ //使用undertow來代替tomacat exclude module:"spring-boot-starter-tomcat" } //替代tomcat compile 'org.springframework.boot:spring-boot-starter-undertow' //健康檢查 compile 'org.springframework.boot:spring-boot-starter-actuator' dependencies { testcompile group: 'junit', name: 'junit', version: '4.12' } } //版本控制插件 dependencymanagement{ imports{ mavenbom "org.springframework.cloud:spring-cloud-dependencies:${springcloudversion}" } }} |
通過注釋可以看到各個代碼塊的作用,這里我們是用阿里云的倉庫
接下來我們開始建eureka注冊中心,通過new->module再建gradle項目來創(chuàng)建
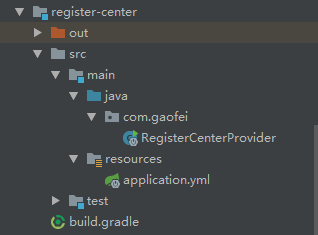
在build中添加eureka-server依賴
|
1
2
|
//表示自己是一個服務(wù)器 compile 'org.springframework.cloud:spring-cloud-starter-eureka-server' |
接下來在application.yml中配置
|
1
2
3
4
5
6
7
8
9
|
server: port: 8000spring: application: name: register-center #起個名字eureka: client: register-with-eureka: false #啟動時不注冊表明自己是一個注冊中心 fetch-registry: false |
啟動類
|
1
2
3
4
5
6
7
8
|
@springbootapplication@enableeurekaserver//表明自己是注冊中心public class registercenterprovider { public static void main(string[] args) { springapplication.run(registercenterprovider.class); }} |
啟動:
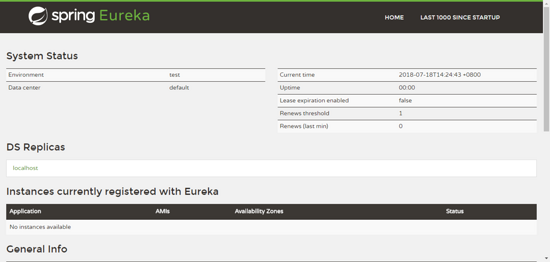
這就表示注冊中心啟動成功
下面創(chuàng)建服務(wù)注冊到服務(wù)中心
創(chuàng)建一個gradle module 項目
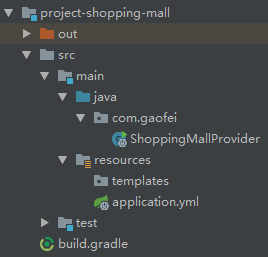
在build.gradle中添加thymeleaf組件,eureka客戶端組件的依賴
|
1
2
3
4
|
//thymeleaf組件 compile 'org.springframework.boot:spring-boot-starter-thymeleaf' //eureka客戶端組件 compile 'org.springframework.cloud:spring-cloud-starter-eureka' |
在application.yml中配置:
|
1
2
3
4
5
6
7
8
9
10
11
12
13
|
server: port: 8001spring: application: name: project-shopping-mall #注冊在注冊中心的名字,它會進(jìn)行鍵值對映射url thymeleaf: cache: false #關(guān)閉緩存eureka: client: service-url: defaultzone: http://localhost:8000/eureka/ #注冊到注冊中心 instance: prefer-ip-address: true #用兩種方式進(jìn)行注冊,一種是使用主機(jī)名注冊,一種是使用ip地址進(jìn)行注冊,這里使用ip地址進(jìn)行注冊 |
啟動類:
|
1
2
3
4
5
6
7
|
@springbootapplication@enablediscoveryclient //表示eureka客戶端public class shoppingmallprovider { public static void main(string[] args) { springapplication.run(shoppingmallprovider.class); }} |
啟動:
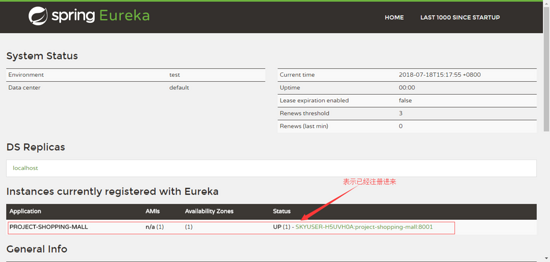
成功!
以上就是本文的全部內(nèi)容,希望對大家的學(xué)習(xí)有所幫助,也希望大家多多支持服務(wù)器之家。
原文鏈接:http://www.cnblogs.com/itgaofei/p/9329375.html


