雖然現在很多開發,都采用了前后端完全分離的模式,即后端只提供數據接口,前端通過ajax請求獲取數據,完全不需要用的模板引擎。這種方式的優點在于前后端完全分離,并且隨著近幾年前端工程化工具和mvc框架的完善,使得這種模式的維護成本相對來說也更加低一點。但是這種模式不利于seo,并且在性能上也會稍微差一點,還有一些場景,使用模板引擎會更方便,比如說郵件模板。這篇文章主要討論spring boot與模板引擎thymeleaf、freemaker以及jsp的集成。
一、集成thymeleaf
第一步:引入jar包(thymeleaf對應的starter):
|
1
2
3
4
|
<dependency> <groupid>org.springframework.boot</groupid> <artifactid>spring-boot-starter-thymeleaf</artifactid></dependency> |
第二步:配置thymeleaf:
|
1
2
3
4
5
6
7
8
9
|
spring: thymeleaf: prefix: classpath:/templates/ check-template-location: true cache: false suffix: .html encoding: utf-8 content-type: text/html mode: html5 |
prefix:指定模板所在的目錄
check-tempate-location: 檢查模板路徑是否存在
cache: 是否緩存,開發模式下設置為false,避免改了模板還要重啟服務器,線上設置為true,可以提高性能。
encoding&content-type:這個大家應該比較熟悉了,與servlet中設置輸出對應屬性效果一致。
mode:這個還是參考官網的說明吧,并且這個是2.x與3.0不同,本文自動引入的包是2.15。
第三步 編寫thymeleaf模板文件:
|
1
2
3
4
5
6
7
8
9
10
11
12
13
14
15
16
17
18
19
20
21
22
23
24
25
26
27
28
|
<!doctype html><html xmlns="http://www.w3.org/1999/xhtml" xmlns:th="http://www.thymeleaf.org"><head> <meta content="text/html;charset=utf-8"/></head><body><h6>thymeleaf 模板引擎</h6><table border="1" bgcolor="#f0ffff"> <thead> <tr> <th>序號</th> <th>標題</th> <th>摘要</th> <th>創建時間</th> </tr> </thead> <tbody th:each="article : ${list}"> <tr> <td th:text="${article.id}"></td> <td th:text="${article.title}"></td> <td th:text="${article.summary}"></td> <td th:text="${article.createtime}"></td> </tr> </tbody></table></body></html> |
大家可以看到,thymeleaf還是比較簡單的,并且最大的特點就是的標簽是作為html元素的屬性存在的,也就是說,該頁面是可以直接通過瀏覽器來預覽的,只是沒有數據而已,這個很方便大家進行調試。
第四步 配置controller:
|
1
2
3
4
5
6
7
8
9
10
11
12
13
14
15
|
@controller@requestmapping("/article")public class articlecontroller { @autowired private articleservice articleservice; @requestmapping("/articlelist.html") public string getarticlelist(model model, string title, @requestparam(defaultvalue = "10") integer pagesize, @requestparam(defaultvalue = "1") integer pagenum) { int offset = (pagenum - 1) * pagesize; list<article> list = articleservice.getarticles(title, 1l, offset, pagesize); model.addattribute("list", list); return "article/articlelist"; }} |
注意,這里用的注解是@controller,而不是@restcontroller,因為@restcontroller會自動將返回結果轉為字符串。
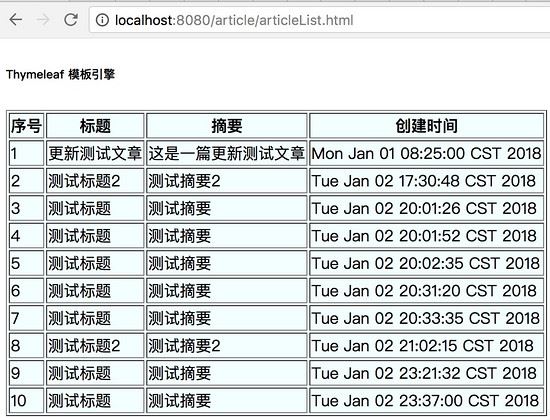
第五步 查看結果

二、spring boot與freemarker的集成
1、引入jar包(freemarker對應的starter)
|
1
2
3
4
|
<dependency> <groupid>org.springframework.boot</groupid> <artifactid>spring-boot-starter-freemarker</artifactid></dependency> |
2、配置freemarker:
|
1
2
3
4
5
6
7
8
|
spring: freemarker: template-loader-path: classpath:/templates/ suffix: .ftl content-type: text/html charset: utf-8 settings: number_format: '0.##' |
除了settings外,其他的配置選項和thymeleaf類似。settings會對freemarker的某些行為產生影響,如日期格式化,數字格式化等,感興趣的同學可以參考官網提供的說明:https://freemarker.apache.org/docs/api/freemarker/template/configuration.html#setsetting-java.lang.string-java.lang.string-
3、編寫freemarker模板文件:
|
1
2
3
4
5
6
7
8
9
10
11
12
13
14
15
16
17
18
19
20
21
22
23
24
|
<html> <title>文章列表</title><body><h6>freemarker 模板引擎</h6> <table border="1"> <thead> <tr> <th>序號</th> <th>標題</th> <th>摘要</th> <th>創建時間</th> </tr> </thead> <#list list as article> <tr> <td>${article.id}</td> <td>${article.title}</td> <td>${article.summary}</td> <td>${article.createtime?string('yyyy-mm-dd hh:mm:ss')}</td> </tr> </#list> </table></body></html> |
4、編寫controller:
|
1
2
3
4
5
6
7
8
9
10
11
12
13
14
15
16
17
18
19
20
21
22
|
@controller@requestmapping("/article")public class articlecontroller { @autowired private articleservice articleservice; @requestmapping("/list.html") public string getarticles(model model, string title, @requestparam(defaultvalue = "10") integer pagesize, integer pagenum) { if (pagesize == null) { pagesize = 10; } if (pagenum == null) { pagenum = 1; } int offset = (pagenum - 1) * pagesize; list<article> list = articleservice.getarticles(title, 1l, offset, pagesize); model.addattribute("list", list); return "article/list"; }} |
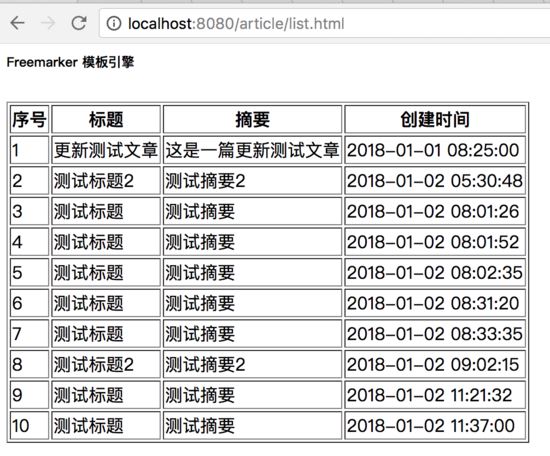
5、訪問頁面:

三、sring boot與jsp集成:
在正式的項目開發中,現在已經極少用jsp模板了,所以spring boot對jsp的支持也不是很好,因此配置起來比thymeleaf和freemaker相對來說就更復雜一點。
第一步 引入jar包:
|
1
2
3
4
5
6
7
8
9
|
<dependency> <groupid>javax.servlet</groupid> <artifactid>jstl</artifactid></dependency><dependency> <groupid>org.apache.tomcat.embed</groupid> <artifactid>tomcat-embed-jasper</artifactid></dependency> |
第一個jstl的依賴用于支持el表達式,第二個依賴用于支持jsp。注意,如果是在外部的tomcat中運行,需要將scope設置為provide,防止jar包沖突。
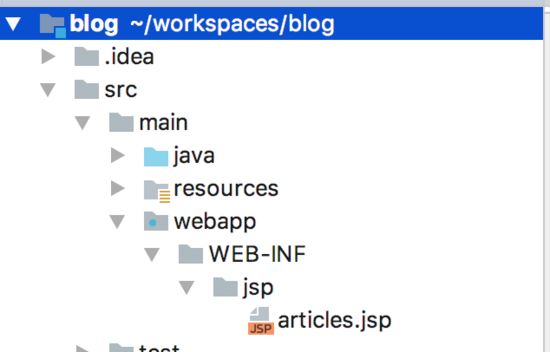
第二步 手動創建webapp目錄:
需要手動在main目錄下創建一個webapp的目錄,結構如下:

第三步 jsp路勁配置:
在application.yml中添加如下配置:
|
1
2
3
4
5
|
spring: mvc: view: prefix: /web-inf/jsp/ suffix: .jsp |
了解spring mvc的應該很熟悉上面的配置。
第四步 編寫jsp頁面:
|
1
2
3
4
5
6
7
8
9
10
11
12
13
14
15
16
17
18
19
|
<%@ page contenttype="text/html;charset=utf-8" language="java" %><%@ taglib uri="http://java.sun.com/jsp/jstl/core" prefix="c"%><html><head> <title>title</title></head><body> <table border="1"> <c:foreach var="article" items="${list}"> <tr> <td>${article.id}</td> <td>${article.title}</td> <td>${article.summary}</td> <td>${article.createtime}</td> </tr> </c:foreach> </table></body></html> |
第五步 編寫controller:
|
1
2
3
4
5
6
7
8
9
10
11
12
13
14
|
@requestmapping("/listjsp") public string getarticlelistjsp(model model, string title, @requestparam(defaultvalue = "10") integer pagesize, integer pagenum) { if (pagesize == null) { pagesize = 10; } if (pagenum == null) { pagenum = 1; } int offset = (pagenum - 1) * pagesize; list<article> list = articleservice.getarticles(title, 1l, offset, pagesize); model.addattribute("list", list); return "articles"; } |
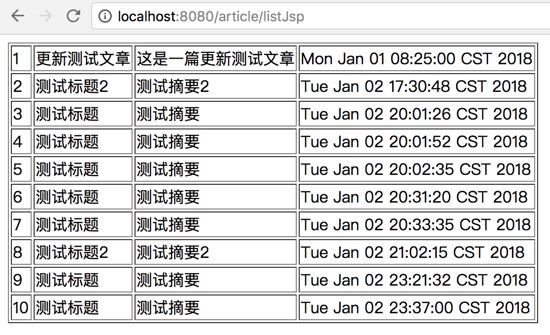
第六步 訪問結果頁面:

四、總結
總體來講,spring boot對thymeleaf和freemaker支持比較友好,配置相對也簡單一點,在實際的開發中,大多也以這兩種模板引擎為主,很少有用jsp的,jsp現在可能更多是在實驗或者學習階段使用。jsp配置比較麻煩一點的事情是不像前兩者,網上的說法基本一致,但是對jsp的配置有很多種說法,比如說是不是需要將jar包改成war包?jsp的依賴是否需要設置為provide等等,這個主要依賴于你是否最后要將程序部署到外部的tomcat還是直接運行jar?因為本文都是直接在idea下直接運行application類,所以這些操作就不需要了。
以上就是本文的全部內容,希望對大家的學習有所幫助,也希望大家多多支持服務器之家。
原文鏈接:http://www.cnblogs.com/paddix/p/8905531.html


